01
Getting started
Install, sign in and download the engine
FastScene starts with a lightweight installer. On first launch, it verifies your account and downloads the video engine for your computer.
macOS
- Download the macOS installerFastScene supports Apple Silicon and Intel on macOS 14 or later.
- Open the DMGDrag FastScene into Applications and open it normally.
Windows
- Download from fastscene.appChoose Download for Windows. FastScene supports 64-bit Windows 10 and 11.
- Keep the file in Microsoft EdgeThe Windows build is not yet publisher-verified, so Edge may flag an uncommon download. Open the menu beside the file, choose Keep, then Keep anyway if another confirmation appears.
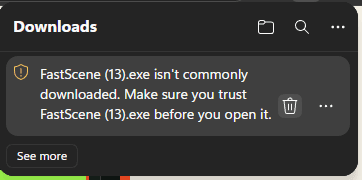
Open the menu beside FastScene.exe and keep the file. 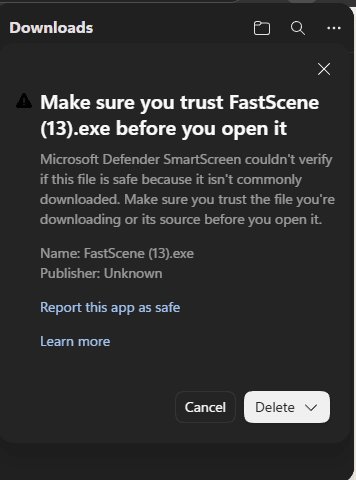
Open the arrow beside Delete and choose Keep anyway. - Open the installerRun FastScene.exe. On Windows protected your PC, choose More info.
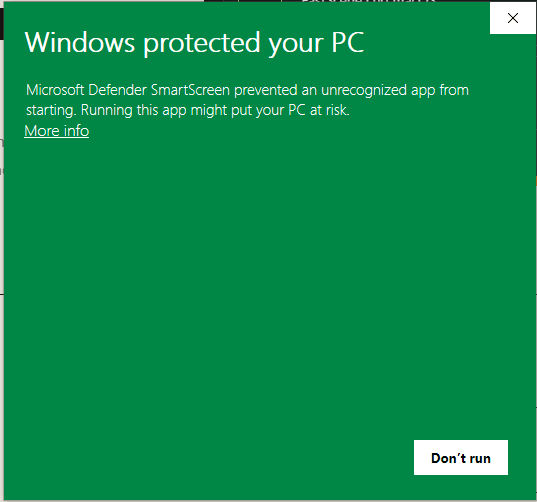
Choose More info on the SmartScreen prompt. - Choose Run anywayConfirm the app name is FastScene and that you downloaded it directly from fastscene.app, then choose Run anyway.
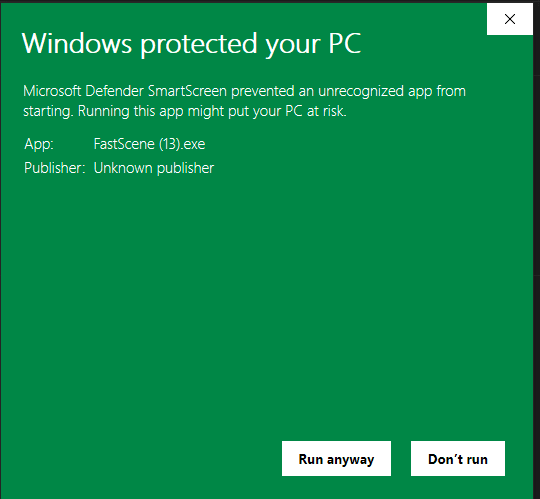
Confirm FastScene.exe and choose Run anyway. - Finish setupLaunch FastScene and keep a stable connection while the lightweight installer downloads the video engine once.
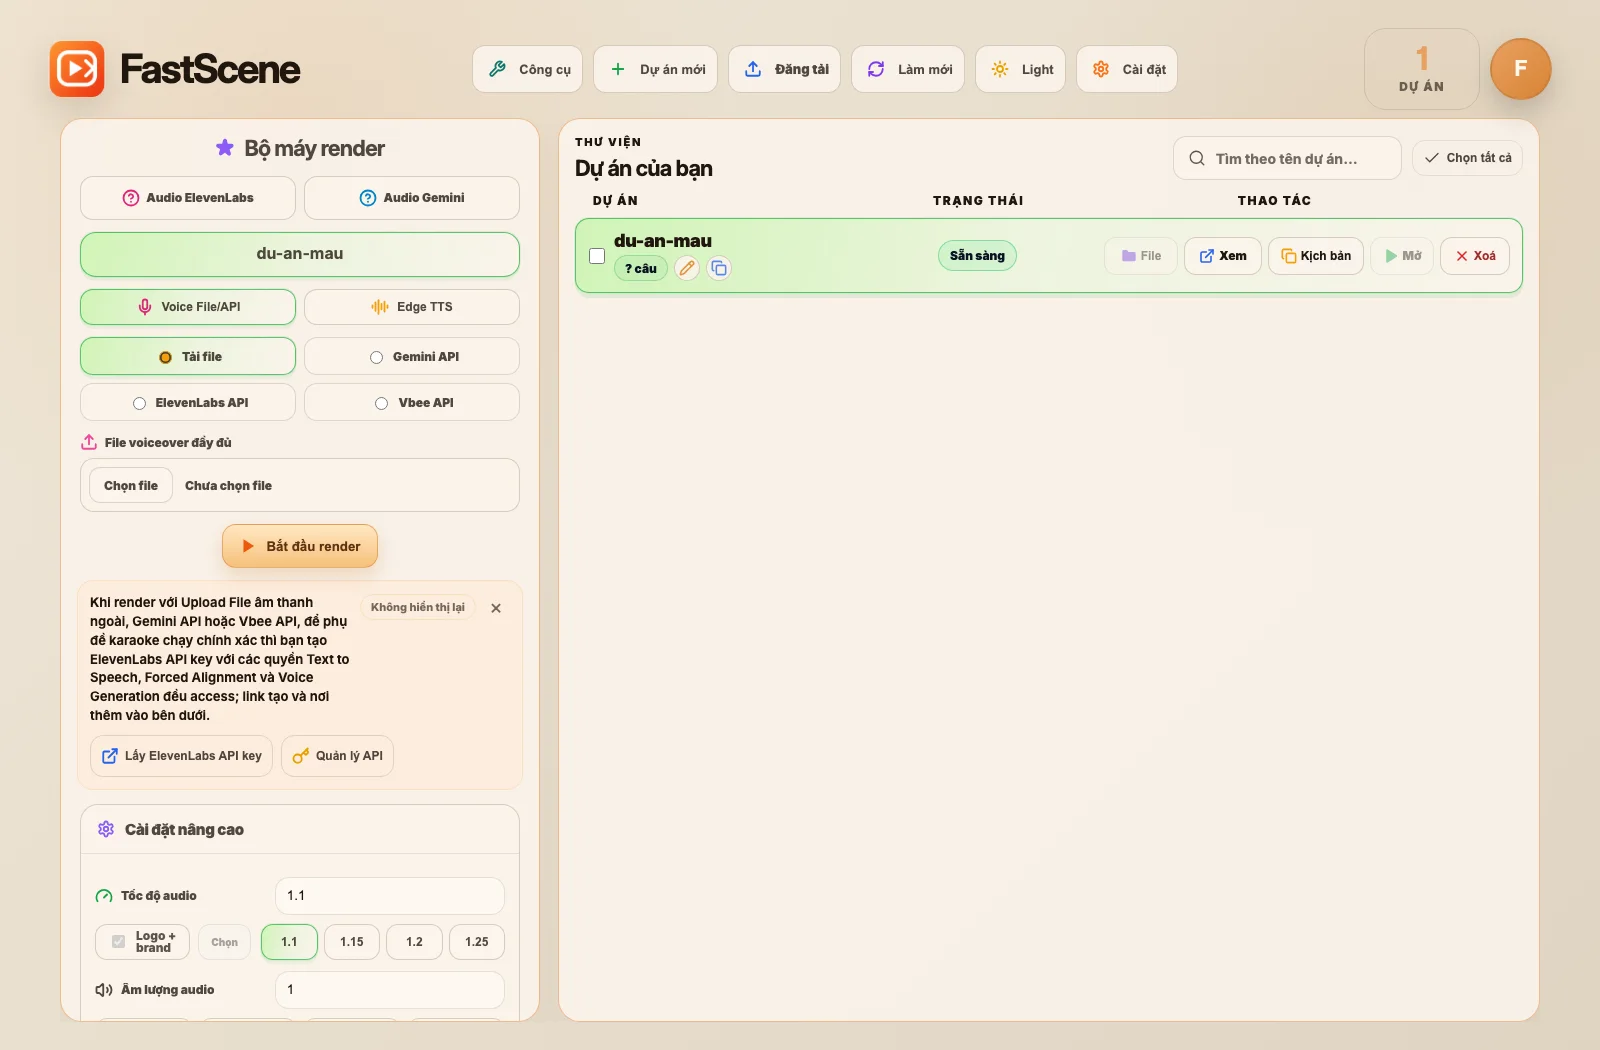
FastScene opens the dashboard after setup and the first engine download.
NoteOnly bypass SmartScreen for a FastScene installer downloaded directly from fastscene.app. Do not continue with a copy received from an unknown link, email or sender.
Account and license
- Sign in with the same Google account used to buy or renew FastScene.
- Trial includes 5 successful exports. Your projects stay on your computer afterwards.
- Pro is licensed to one device. Custom projects are a separate one-time add-on.
- A web purchase or renewal normally appears in an open app within about 5 minutes without signing out.
02
Projects
Create a comparison or custom project
Choose New project on the dashboard, then select the project type that matches the video you want to build.
Comparison project
- Name the projectUse a short, recognizable name. FastScene creates a separate folder and saves edits automatically.
- Paste the scriptEach line is a reading beat. Break lines where you want the pacing to change.
- Build comparisonsEach item has labels, colors, left/right media and a starting script line.
Custom project
- Custom projects require the one-time custom-layout add-on.
- Each slide can include titles, multiple text layers, image or video, effects, sound and its own background.
- New slides inherit relevant style choices so you do not need to rebuild every control from scratch.
03
Editor
Edit media, labels and scene timing
The editor autosaves. Wait for the saved status before closing the app or switching projects immediately after an edit.
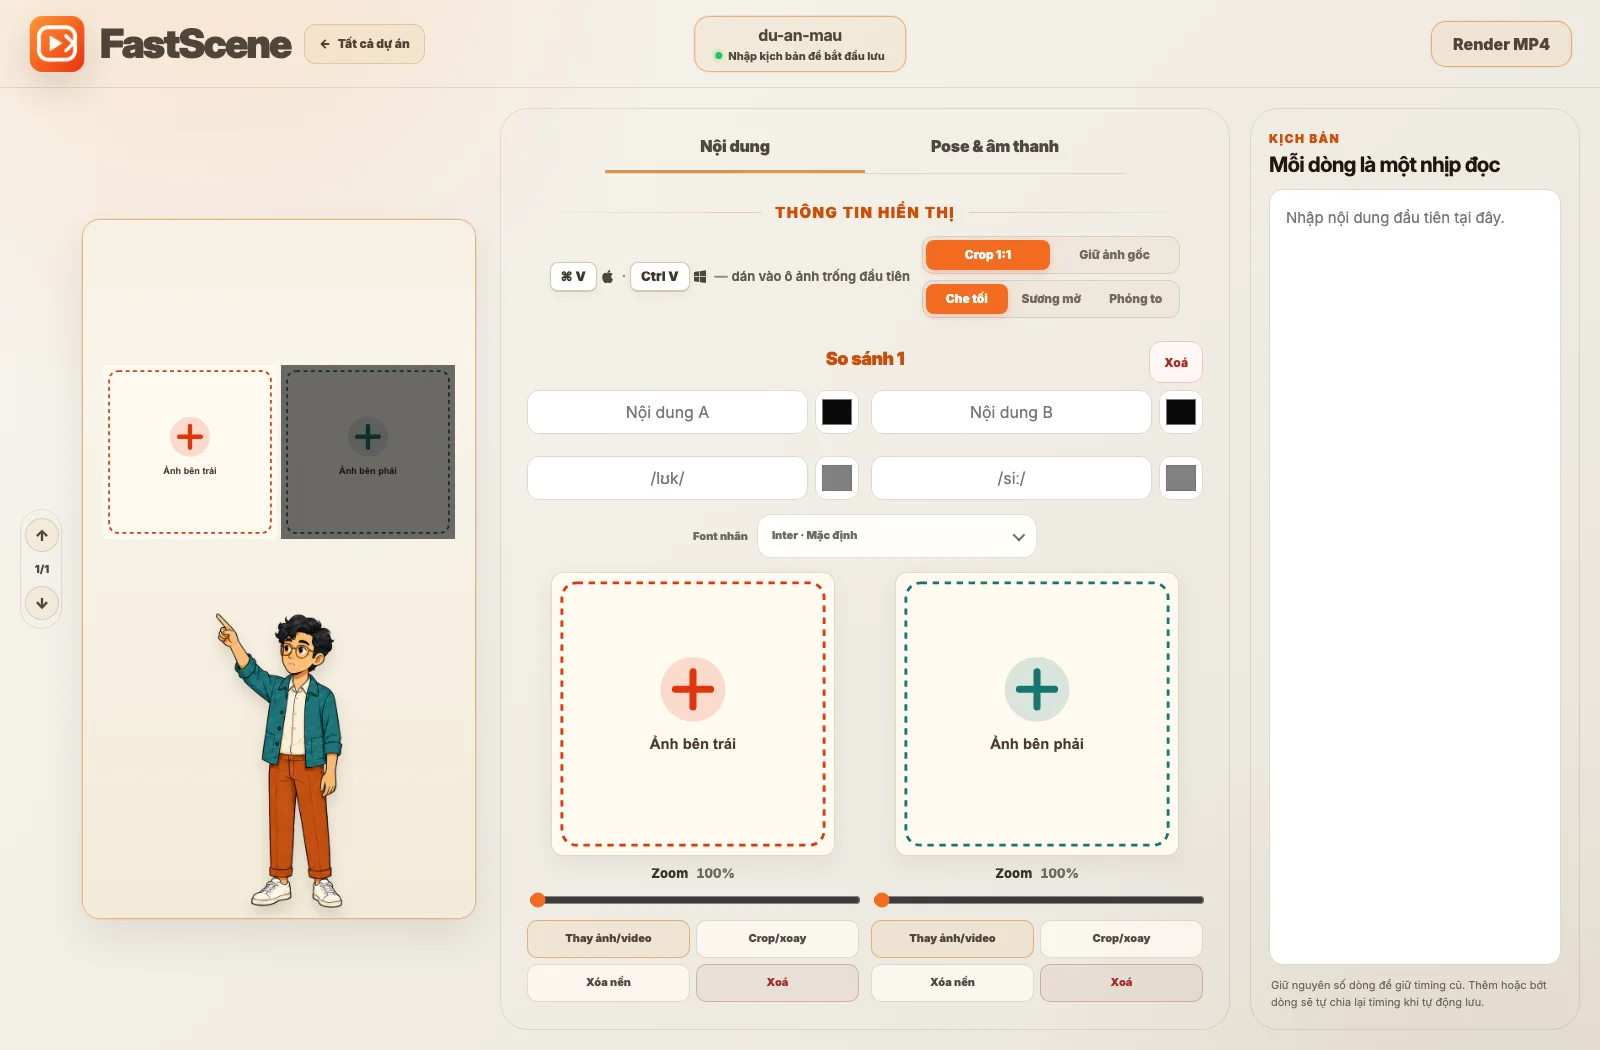
Comparison editor
- Set the main and secondary labels, colors and label font.
- Replace media or paste an image with Cmd+V on macOS and Ctrl+V on Windows.
- Use zoom, crop/rotate and background removal to frame the subject.
- Add comparisons or a single-image scene, then choose presenter poses and sound cues.
Custom editor
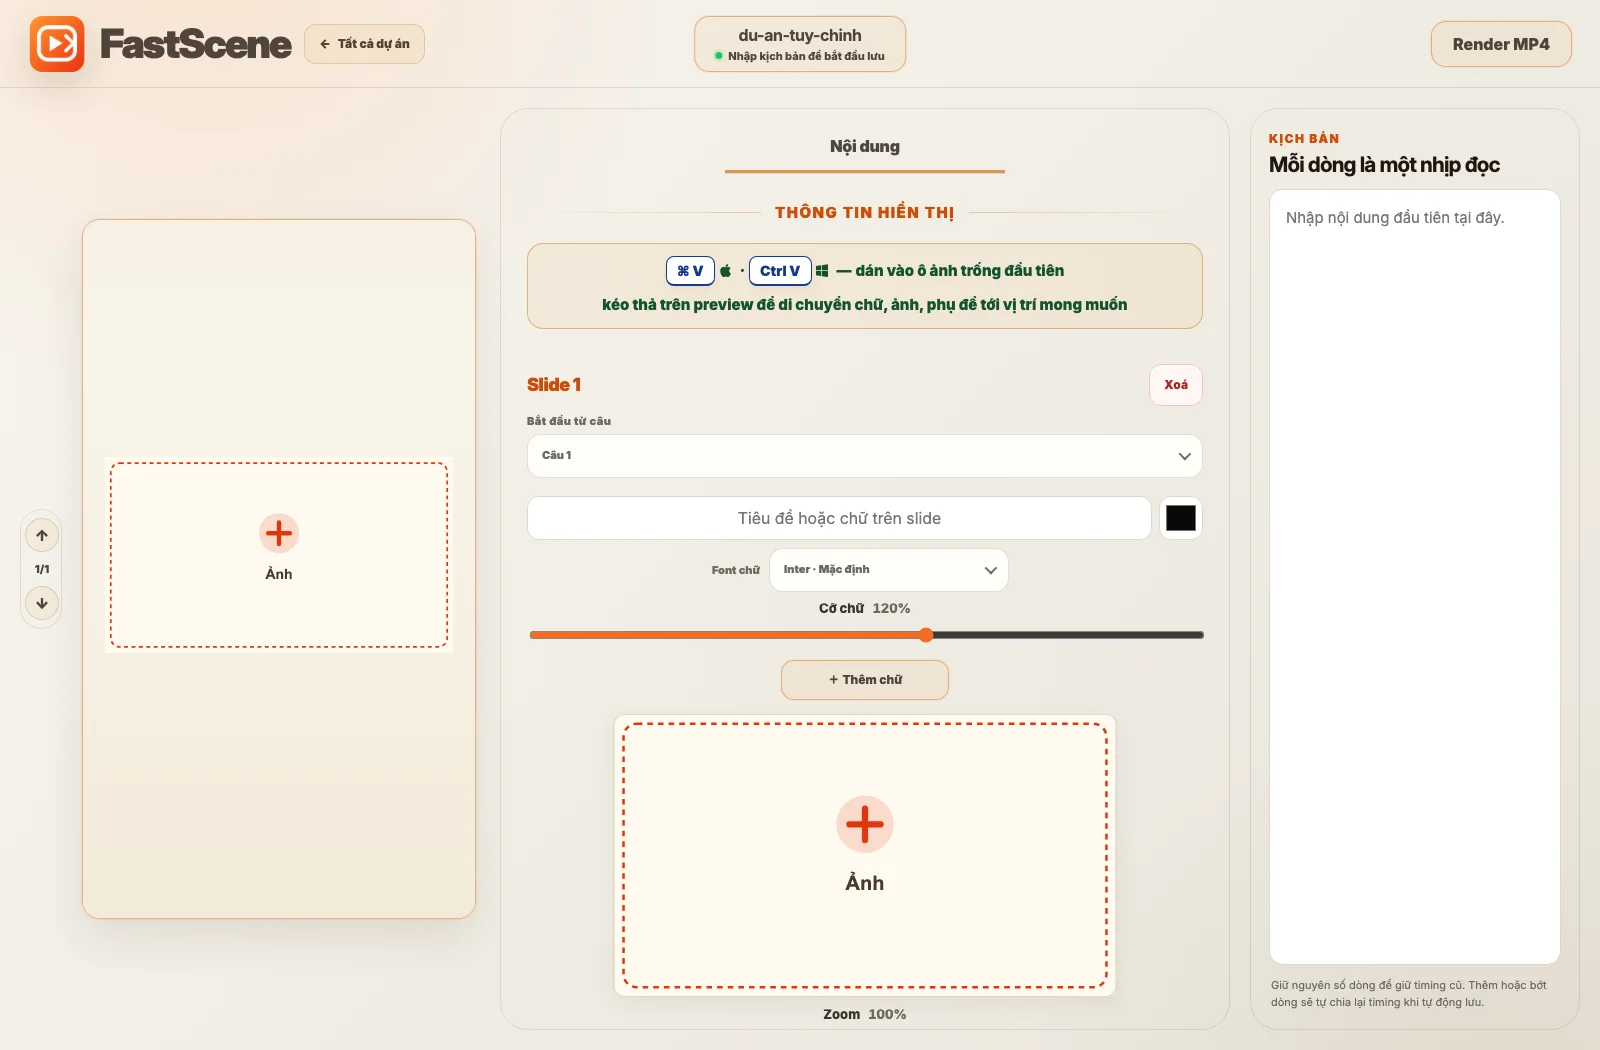
- Drag text, images and subtitles directly on the preview.
- Add multiple text layers, select an effect and sound for each content box, and add more slides.
- Use a color, image or video as the project background.
04
Voiceover
Choose the right audio workflow
FastScene supports a complete uploaded voiceover, Gemini API, ElevenLabs API, Vbee API and Edge TTS.
Important — avoid freeze-frames
Add a free ElevenLabs API key before you render
Before rendering, add an ElevenLabs API key (completely free) with all 3 permissions — Text to Speech, Forced Alignment, and Voice Generation — so the finished video does not freeze and subtitles stay accurate.
- Text to Speech → Access
- Forced Alignment → Access
- Voice Generation → Access
- Create the keyOpen ElevenLabs → Developers → API Keys and choose Create Key. Set a credit limit if you want to control spend.
- Grant the first 3 permissionsUnder Restrictions, set Text to Speech, Forced Alignment, and Voice Generation to Access. The remaining permissions can stay No access.
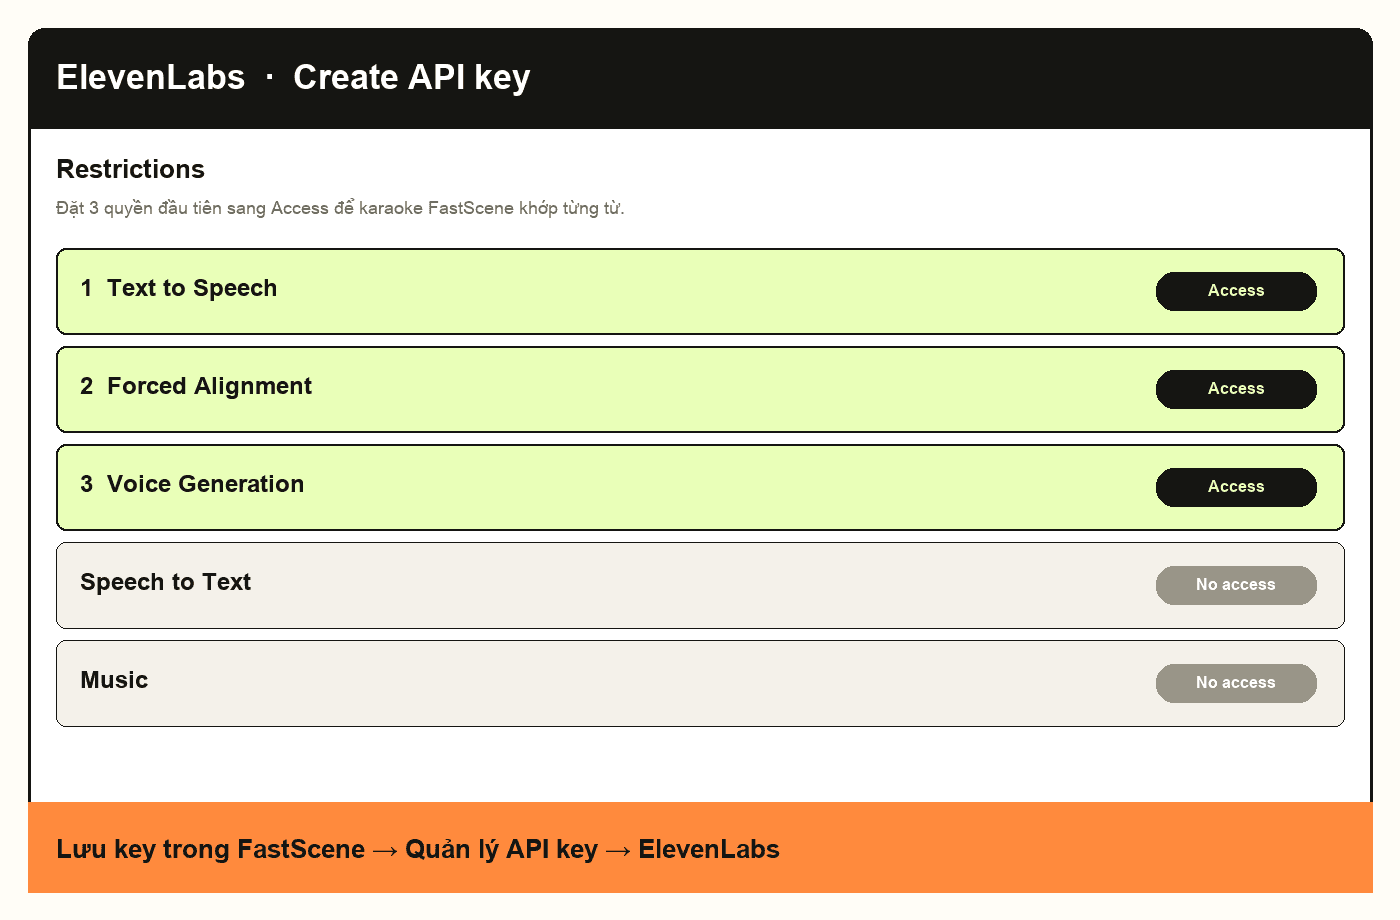
Set the first three permissions to Access. Other permissions can stay No access. - Save it in FastSceneCopy the key, then open API key management → ElevenLabs and paste it. FastScene uses this key to align karaoke captions.
NoteThe same notice appears in the app when you render with an uploaded file, Gemini, or Vbee. If you use ElevenLabs API for speech, keep these three permissions enabled.
Upload a complete voiceover
- Prepare one full audio fileThe recording should follow every script line in order.
- Choose Voice File/API → Upload fileSelect the MP3, WAV or another supported audio file.
- Align captionsWord-accurate karaoke needs the ElevenLabs API key with the first 3 Access permissions in the callout above.
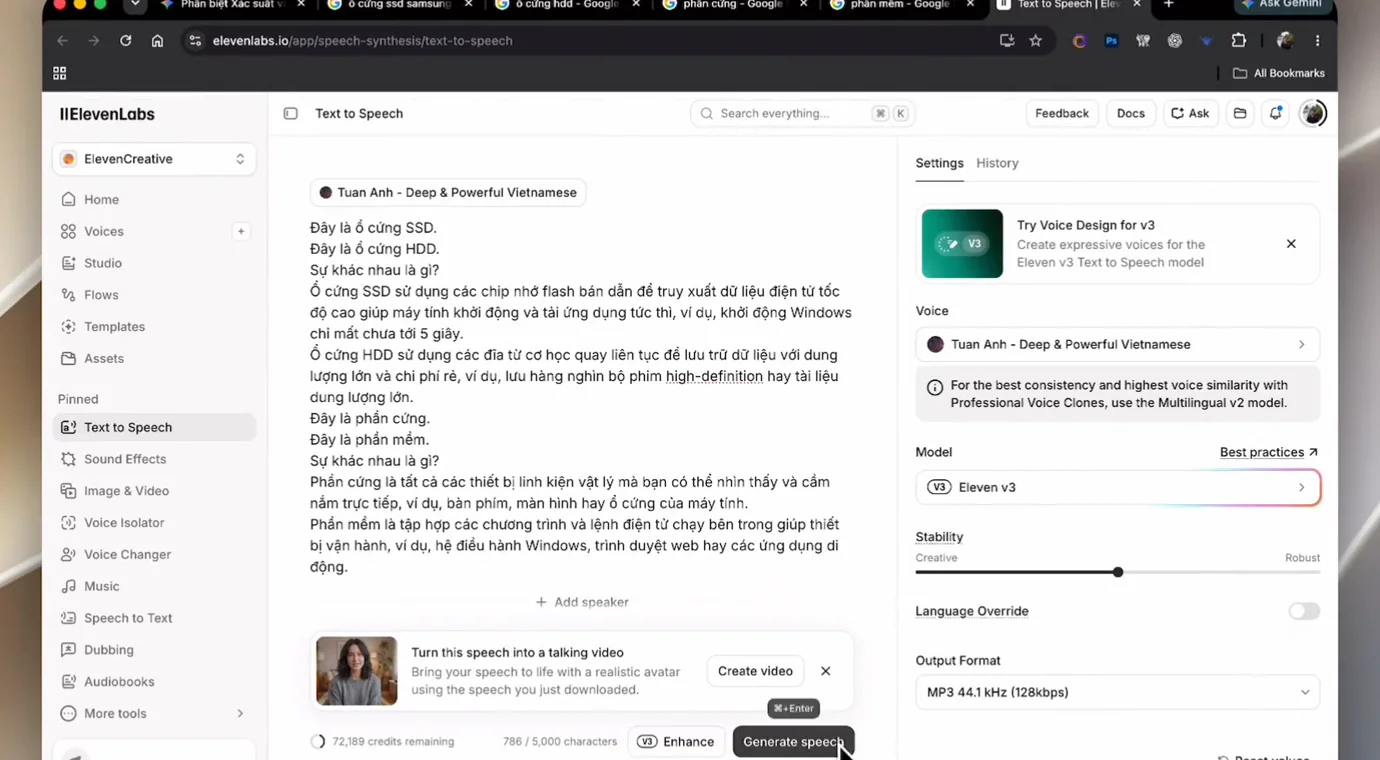
ElevenLabs manual or API
- Manual: paste the full script into Text to Speech, choose a voice and model, generate, download, then upload the file to FastScene.
- API: create a restricted API key with the first 3 Access permissions, copy the Voice ID, and save both in FastScene API key management.
- Keep API keys private and use a credit limit to control third-party spend.
Gemini API
- Create a keyOpen Google AI Studio API Keys and create a new key. Never publish or share it.
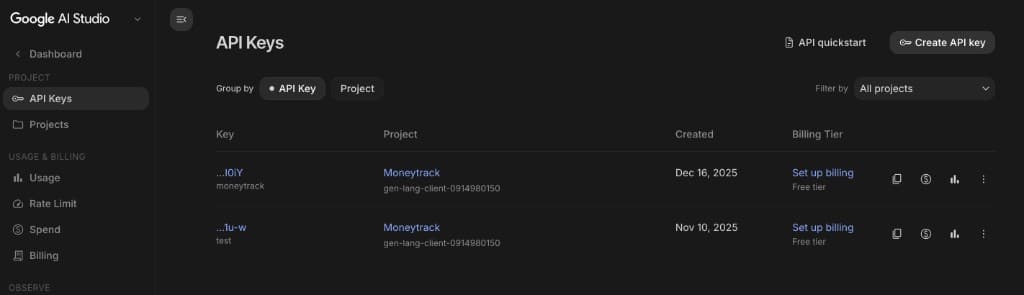
Google AI Studio → API Keys → Create API key. - Add it to FastSceneOpen API key management, choose Gemini and add the key. FastScene can rotate multiple keys on permission or quota errors.
- Set the deliveryChoose voice, style, pace, accent and randomness before rendering. Word-accurate karaoke still needs the ElevenLabs key in the callout above.
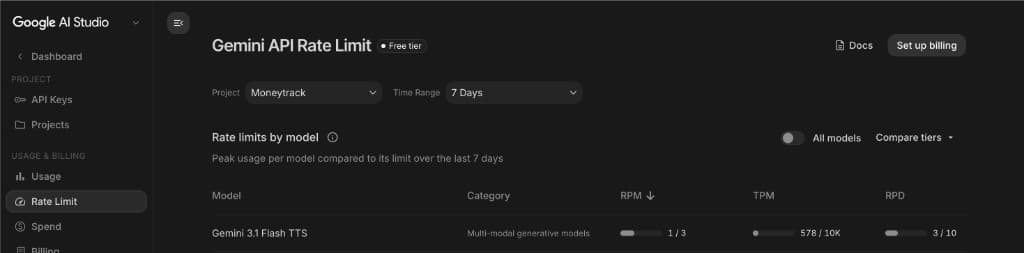
NoteGoogle AI Studio free accounts get about 10 Gemini TTS calls per day. When the quota resets, wait for the next day or set up billing on Google.
Vbee and Edge TTS
- Vbee: add your App ID, Token, voice code and speed, then choose Batch or Realtime.
- Edge TTS needs no API key, but still requires network access to generate speech.
- Enable Regenerate audio cache only when you want to replace an existing generated voiceover.
05
Export
Render one project or a batch
FastScene generates speech, renders frames, assembles captions and sound, and writes the final MP4 locally.
Single project
- Select the projectChoose it on the dashboard so it appears in the render panel.
- Check audio and advanced settingsConfirm the provider, branding, resolution, speed and volume.
- Start renderKeep the app open and follow the progress log.
- Open the resultThe final file is output/final_video.mp4 inside the project folder.
Batch render
- Select multiple projects or Select all, then start the queue.
- Batch render cannot use a manually uploaded audio file. Save Gemini, ElevenLabs API, Vbee or Edge TTS settings first.
06
Upload Center
Prepare captions and publish
Upload Center requires an active Pro account and a rendered output/final_video.mp4.
Publishing copy
- The first caption line becomes the YouTube title.
- The full caption is used for Facebook and the YouTube description, and can be edited before upload.
- Keep the Facebook source URL in the separate Source comment field.
- Choose publish now or a schedule for each platform.
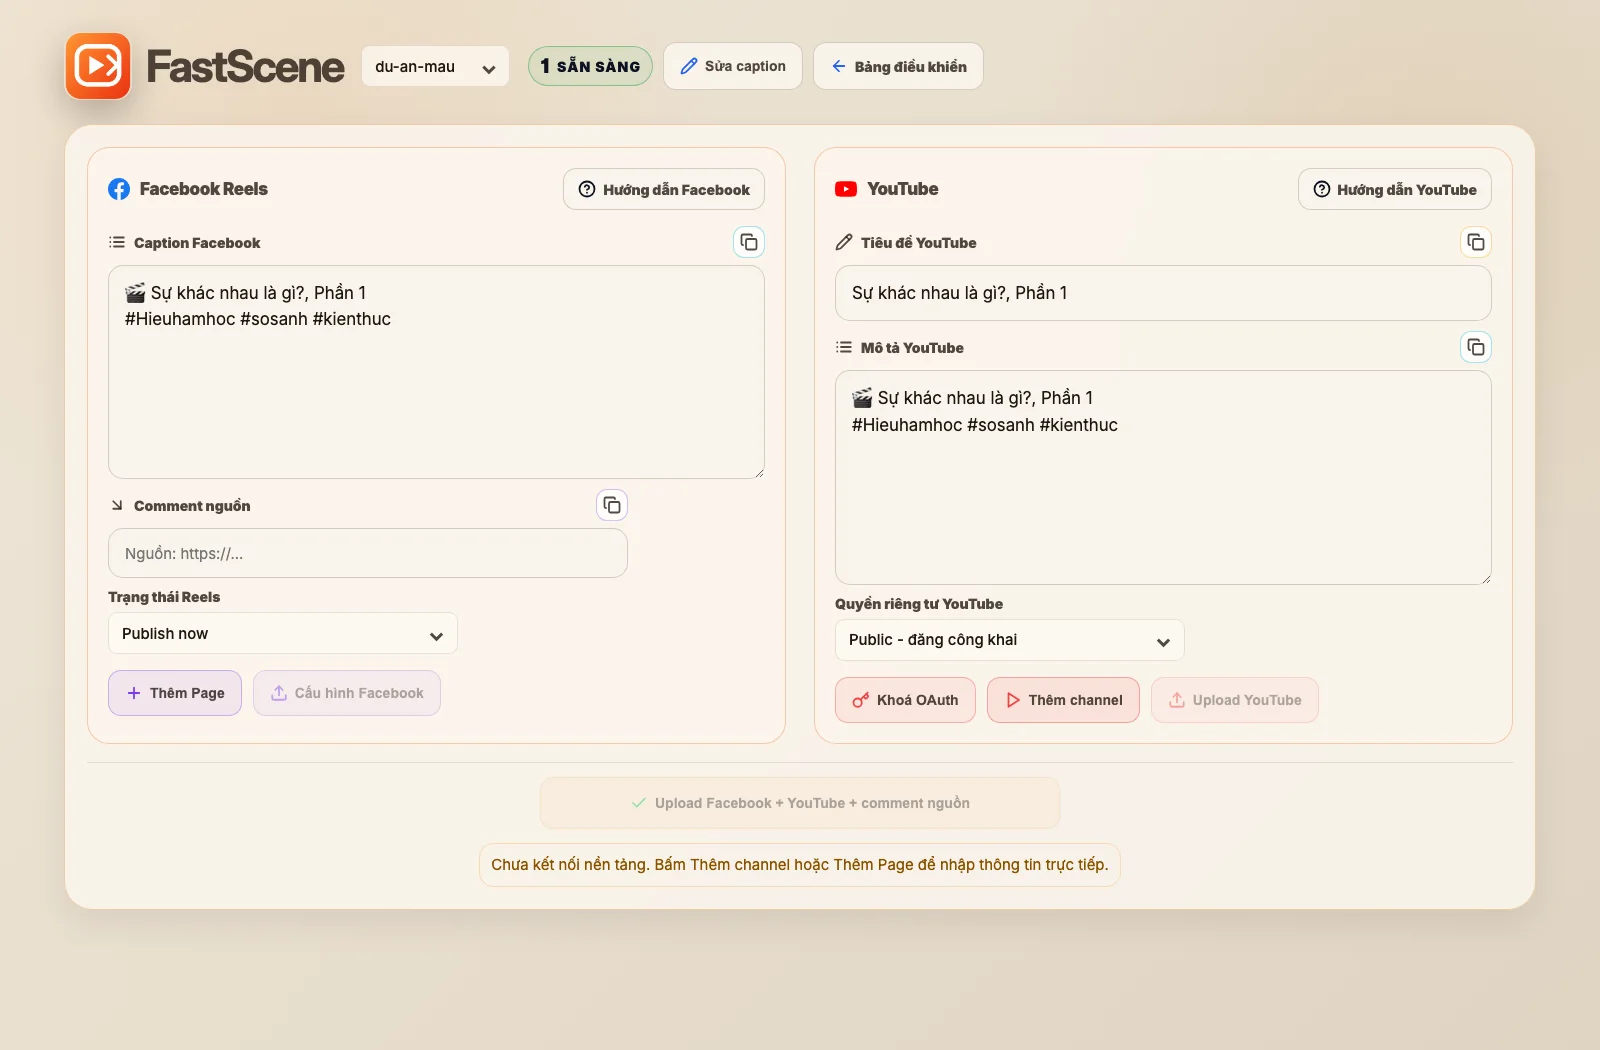
Publish to both platforms
- Connect at least one Facebook Page and one YouTube channel.
- FastScene uploads Facebook first, then YouTube. Keep the app open until both complete.
- For scheduled Facebook Reels, add the source comment after the Reel is actually published.
07
YouTube
Connect the YouTube Data API
Set up Google Cloud once, then add and switch channels from Upload Center.
1. Create the project and enable the API
- Create or select a projectOpen Google Cloud Console and create a dedicated project, or select one you already use.
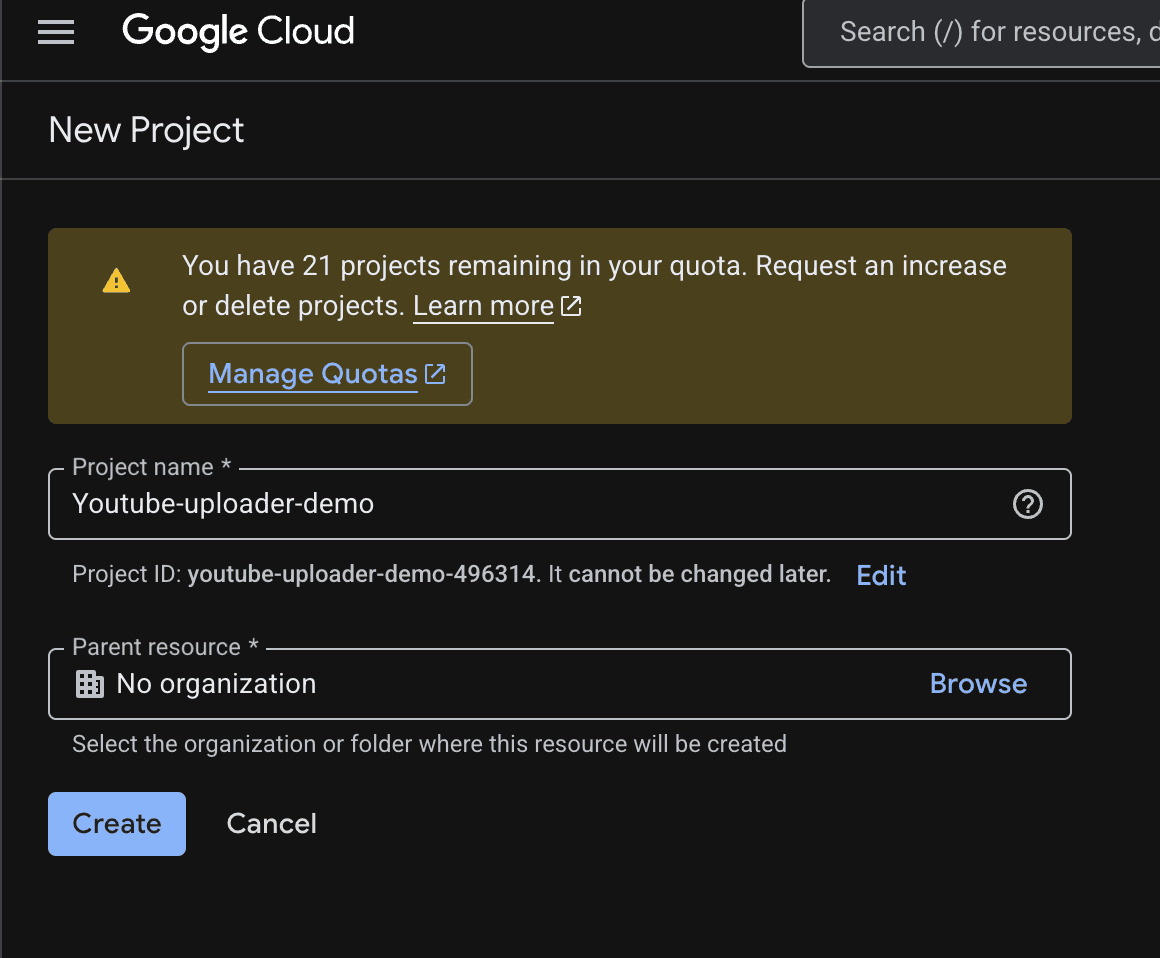
Create or select the Google Cloud project used by Upload Center. - Open API LibraryGo to APIs & Services → Library and search for YouTube Data API v3.
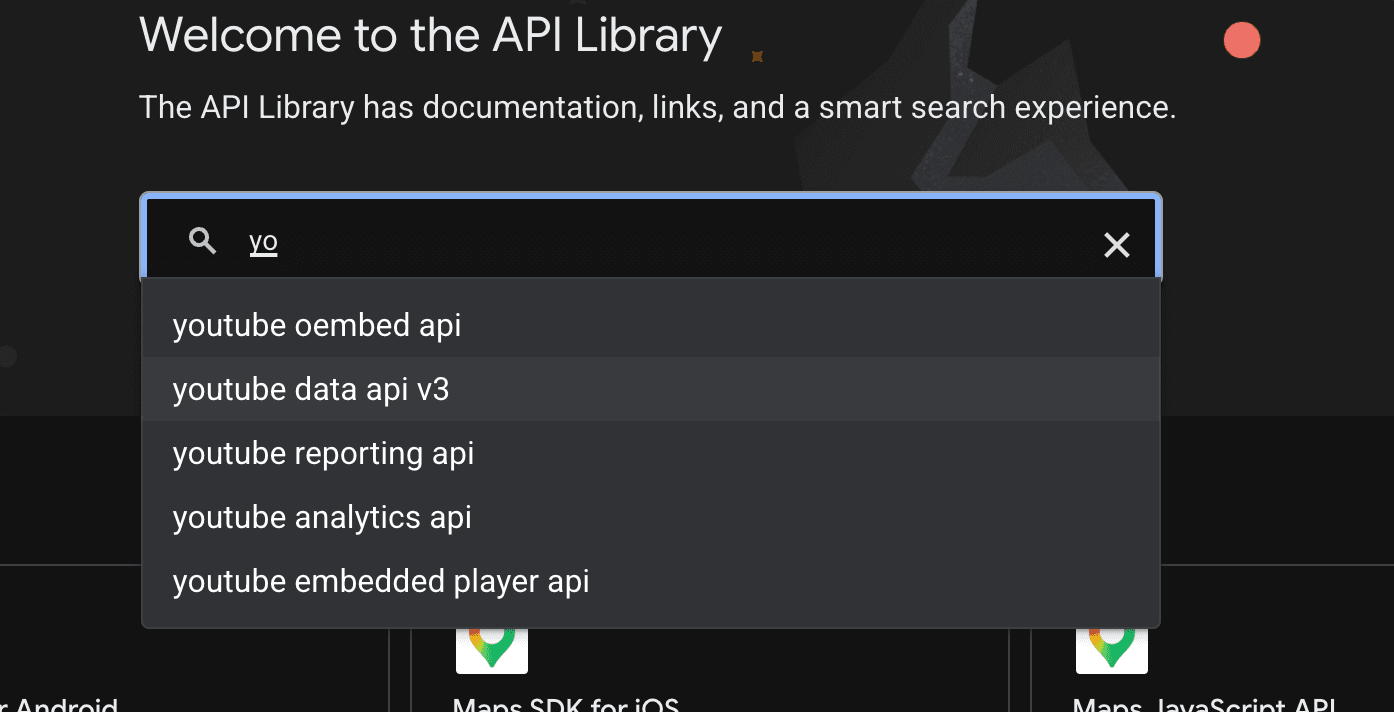
Find YouTube Data API v3 in API Library. - Enable the APIOpen its Product details page and choose Enable.
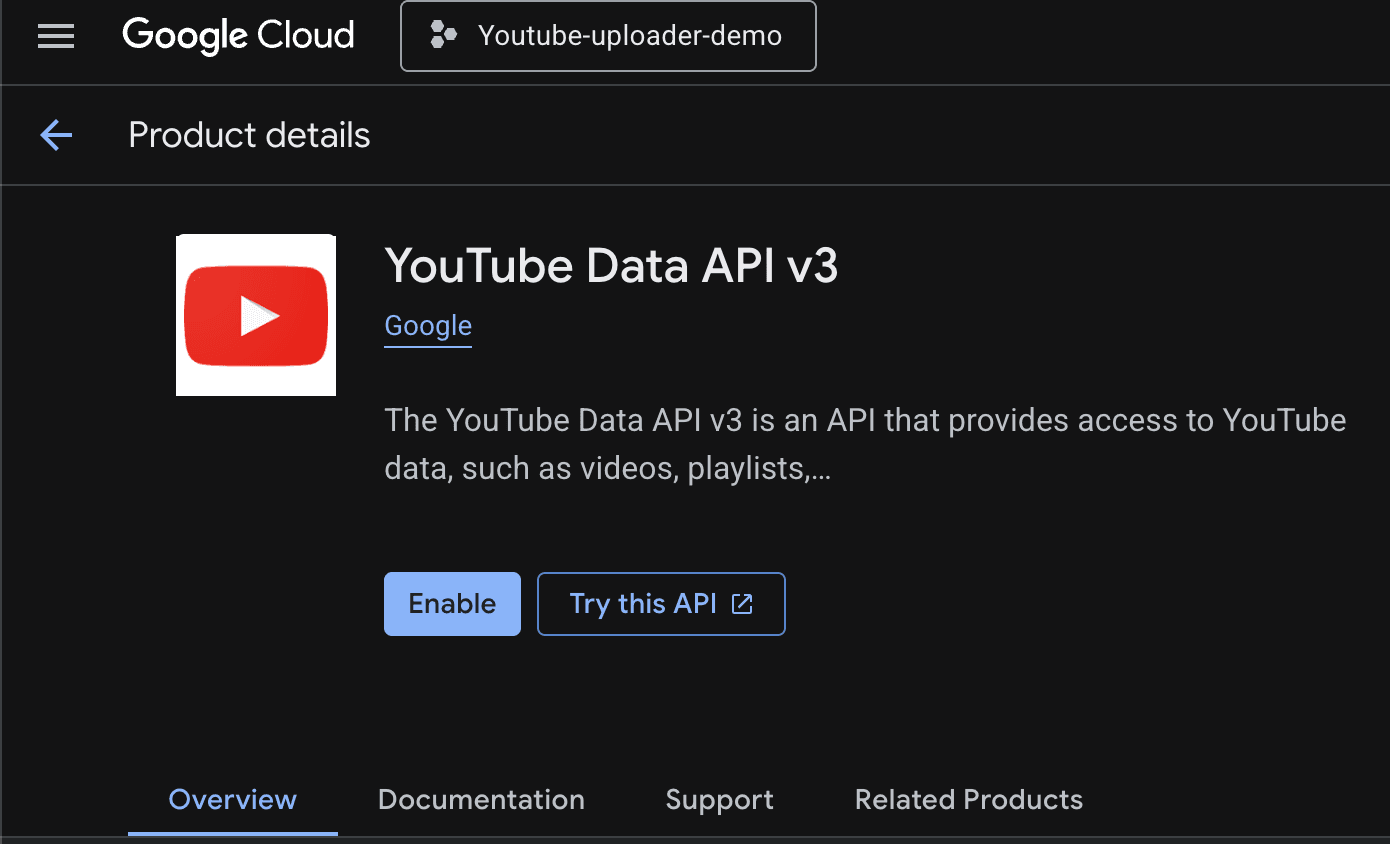
Open Product details and choose Enable.
2. Configure OAuth consent
- Start the consent screenOpen OAuth consent screen → Get Started, then enter the app name, support email and developer contact email.
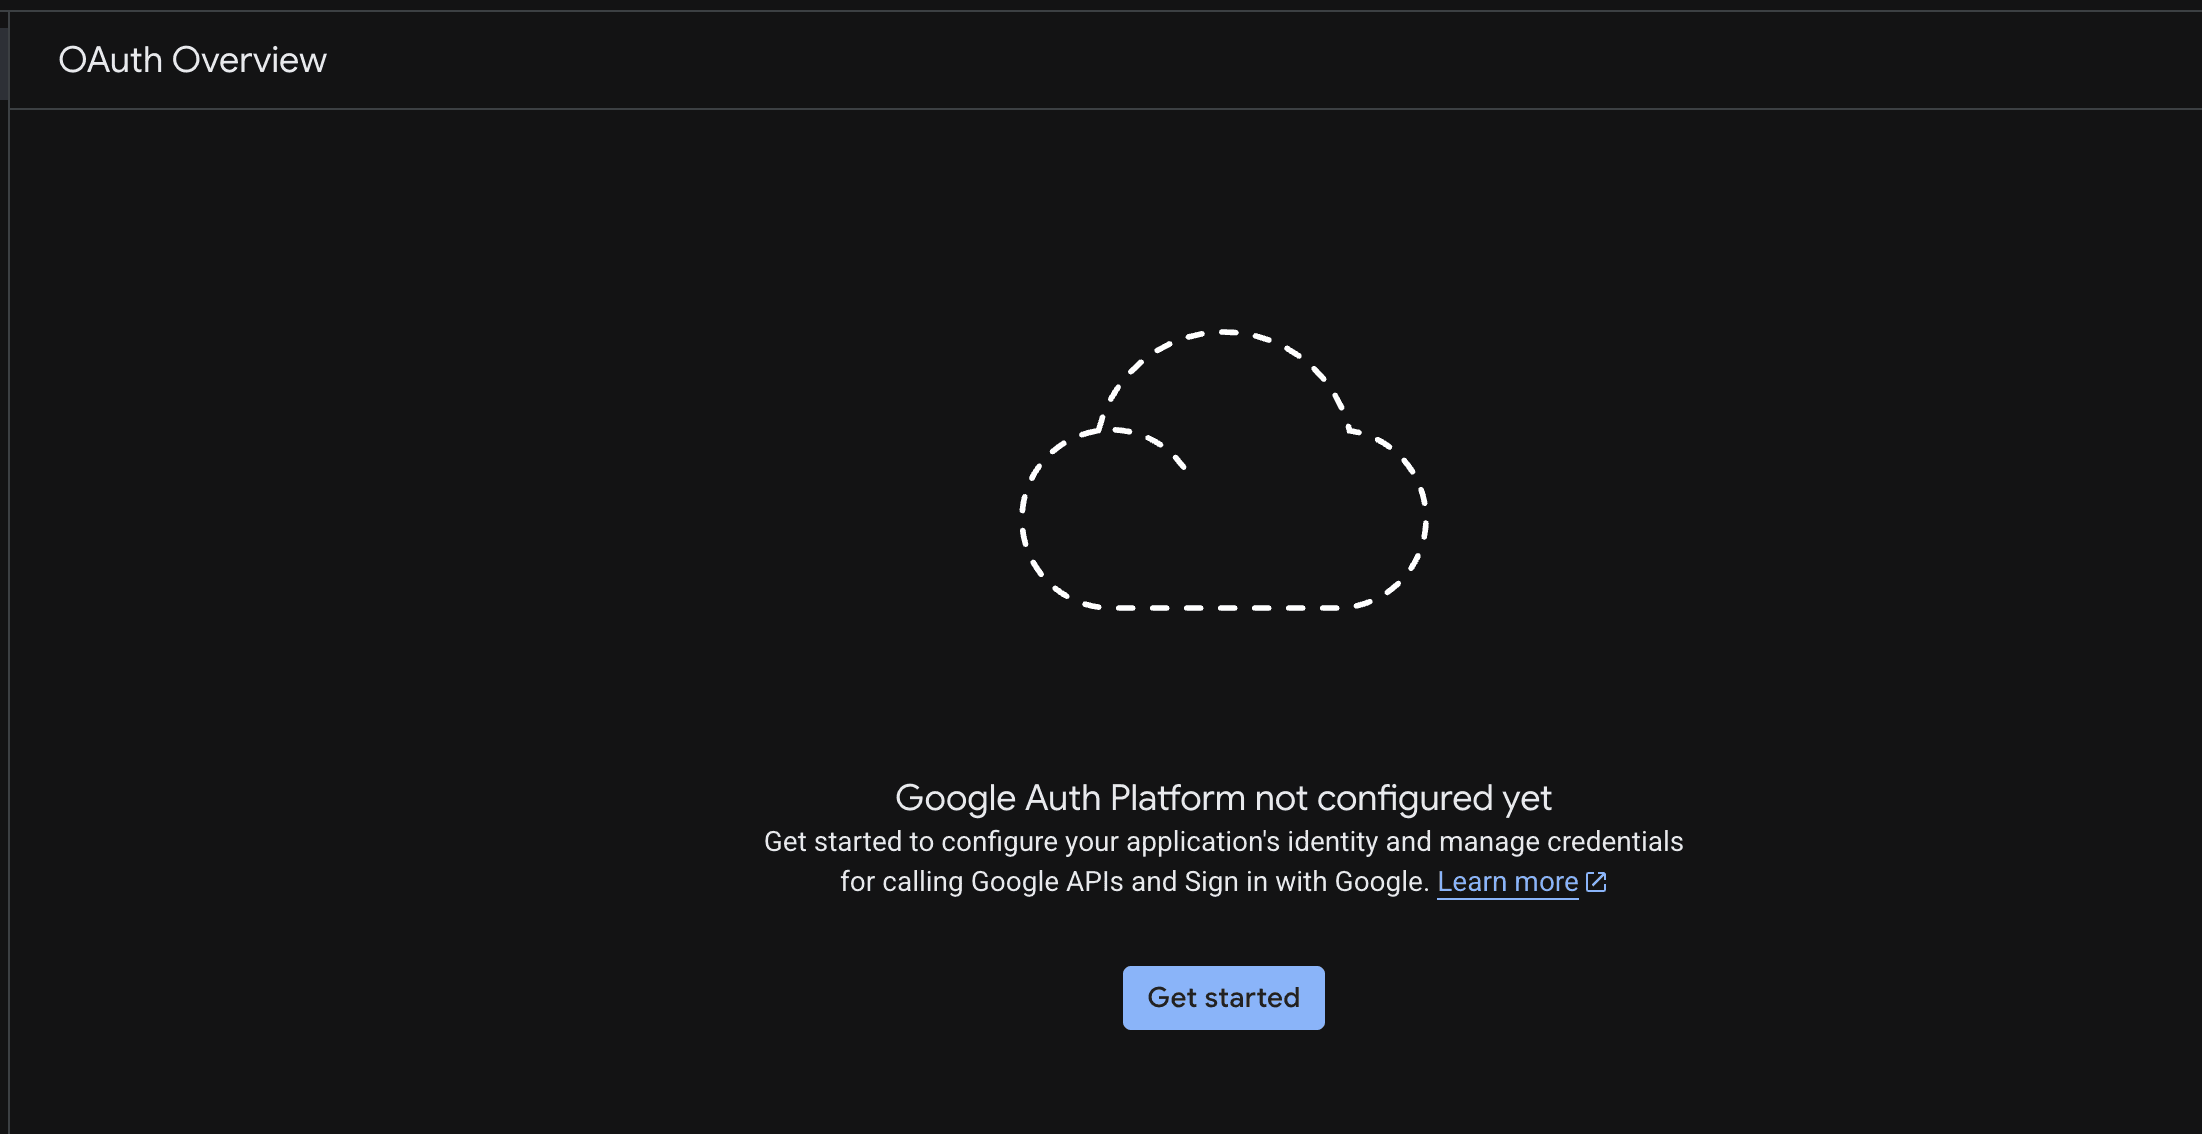
Configure OAuth consent before creating the Web application client. - Choose ExternalUse External for regular Google accounts or accounts outside your organization.
- Add test usersWhile the app is in Testing, add every Google account that needs to connect a channel.
- Move to In productionOnce setup works, change Publishing status to In production. External apps left in Testing can have refresh tokens limited to about 7 days.
NoteIn production does not make a token permanent. Google can still revoke access after security changes, user revocation or long inactivity.
3. Create the OAuth client
- Open ClientsChoose Clients → Create Client and use Web application as the application type.
- Add the callbackPaste the exact FastScene URI below into Authorized redirect URIs.
- Save the credentialsCopy the Client ID and Client Secret and keep both private.
http://localhost:8765/api/social/youtube/callbackNoteThe redirect URI must match exactly, including http, localhost, port 8765 and the path.
4. Connect the channel in FastScene
- Open Upload Center with a project that already has output/final_video.mp4.
- Open OAuth key or Add channel, paste the Client ID and Client Secret, then Save and connect.
- Sign in to the Google account that can upload to the channel and approve the requested YouTube scopes.
- Review title, description, visibility or schedule, then upload.
5. Common OAuth issues
- redirect_uri_mismatch: the Google Cloud URI must exactly match the localhost:8765 callback in FastScene.
- No refresh_token: remove the old app under Google Account → Security → Third-party access, then add the channel again.
- invalid_grant or revoked token: reconnect. If it repeats after about 7 days, move the consent screen out of Testing.
- Another account cannot sign in: add it as a Test user or move the app to In production; Google may require verification depending on distribution and scopes.
08Facebook
Connect a Page for Reels
FastScene uses the Facebook Reels Publishing API. Save a Page ID and Page access token in Upload Center. To publish for Pages outside the app team, the Meta app must be Live.
1. Create the Meta app
- Create AppOpen Meta for Developers → My Apps → Create App.
- Choose the Page use caseFilter Content management and select Manage everything on your Page. This is the use case used to publish Page content and video.
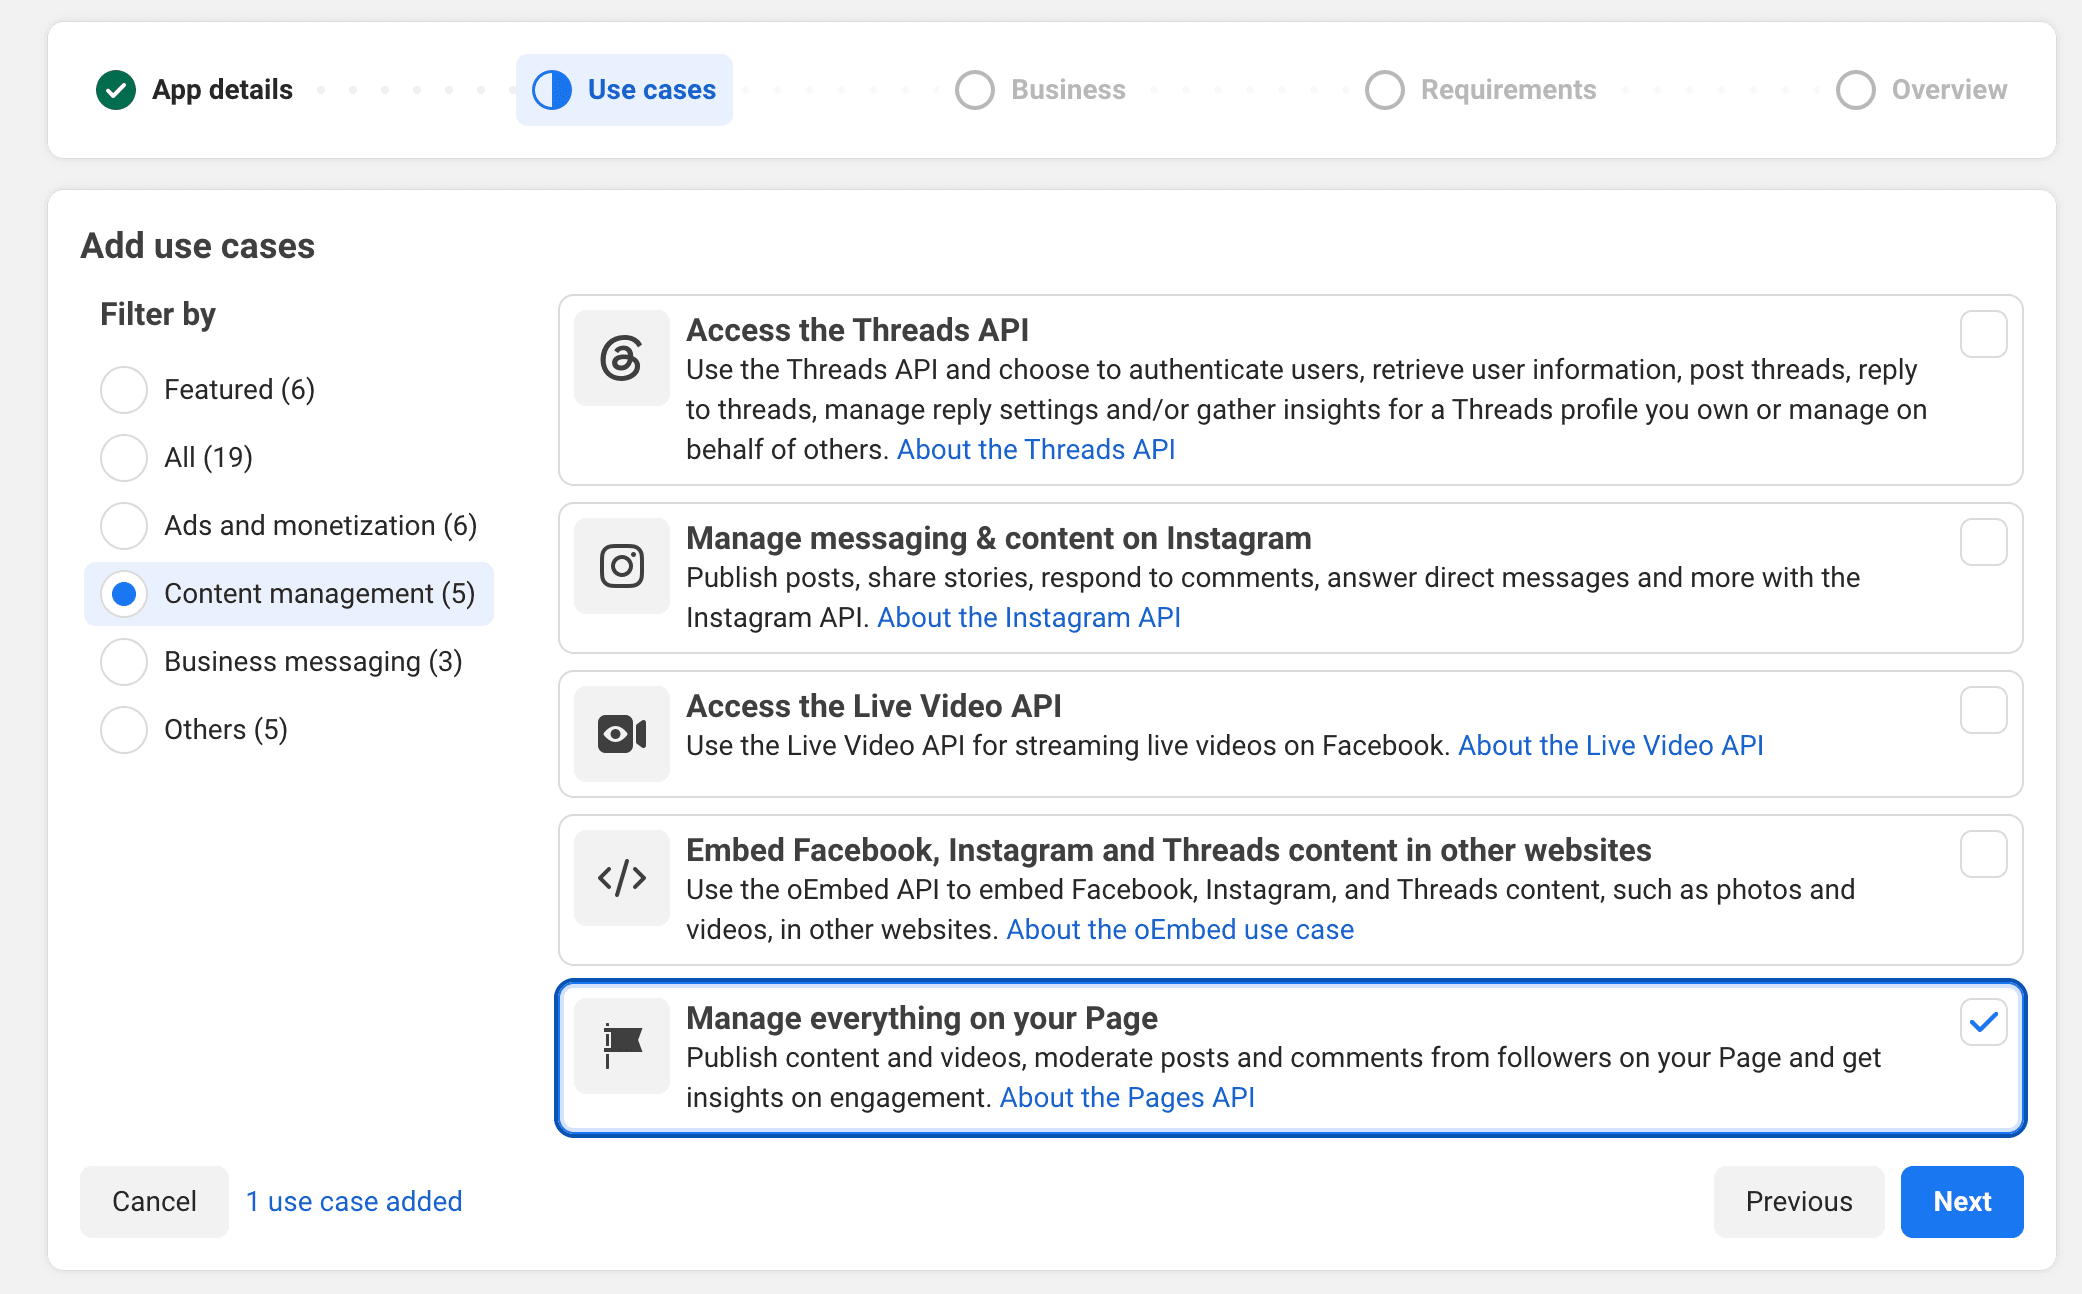
Choose Manage everything on your Page, then Next. - Choose a Business portfolioSelect the portfolio that manages the Page, or continue without one when appropriate.
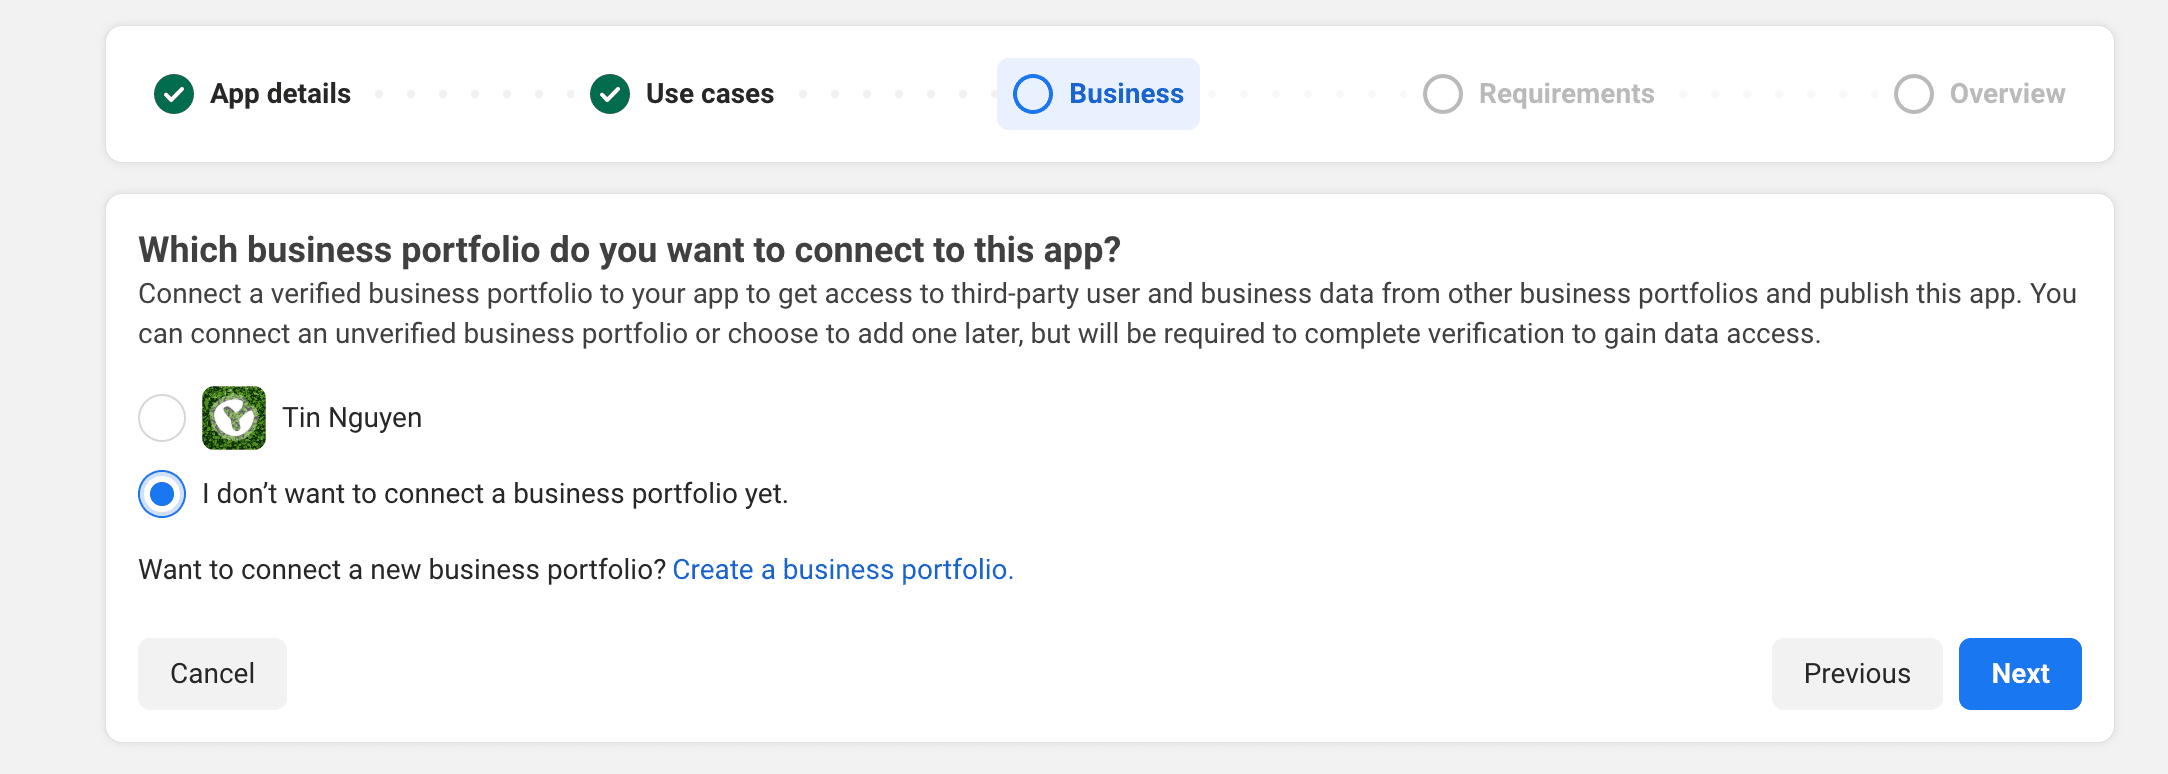
Choose a Business portfolio or continue without one. - CustomizeFinish app creation, then open Customize/Add use cases if Meta asks for more setup.
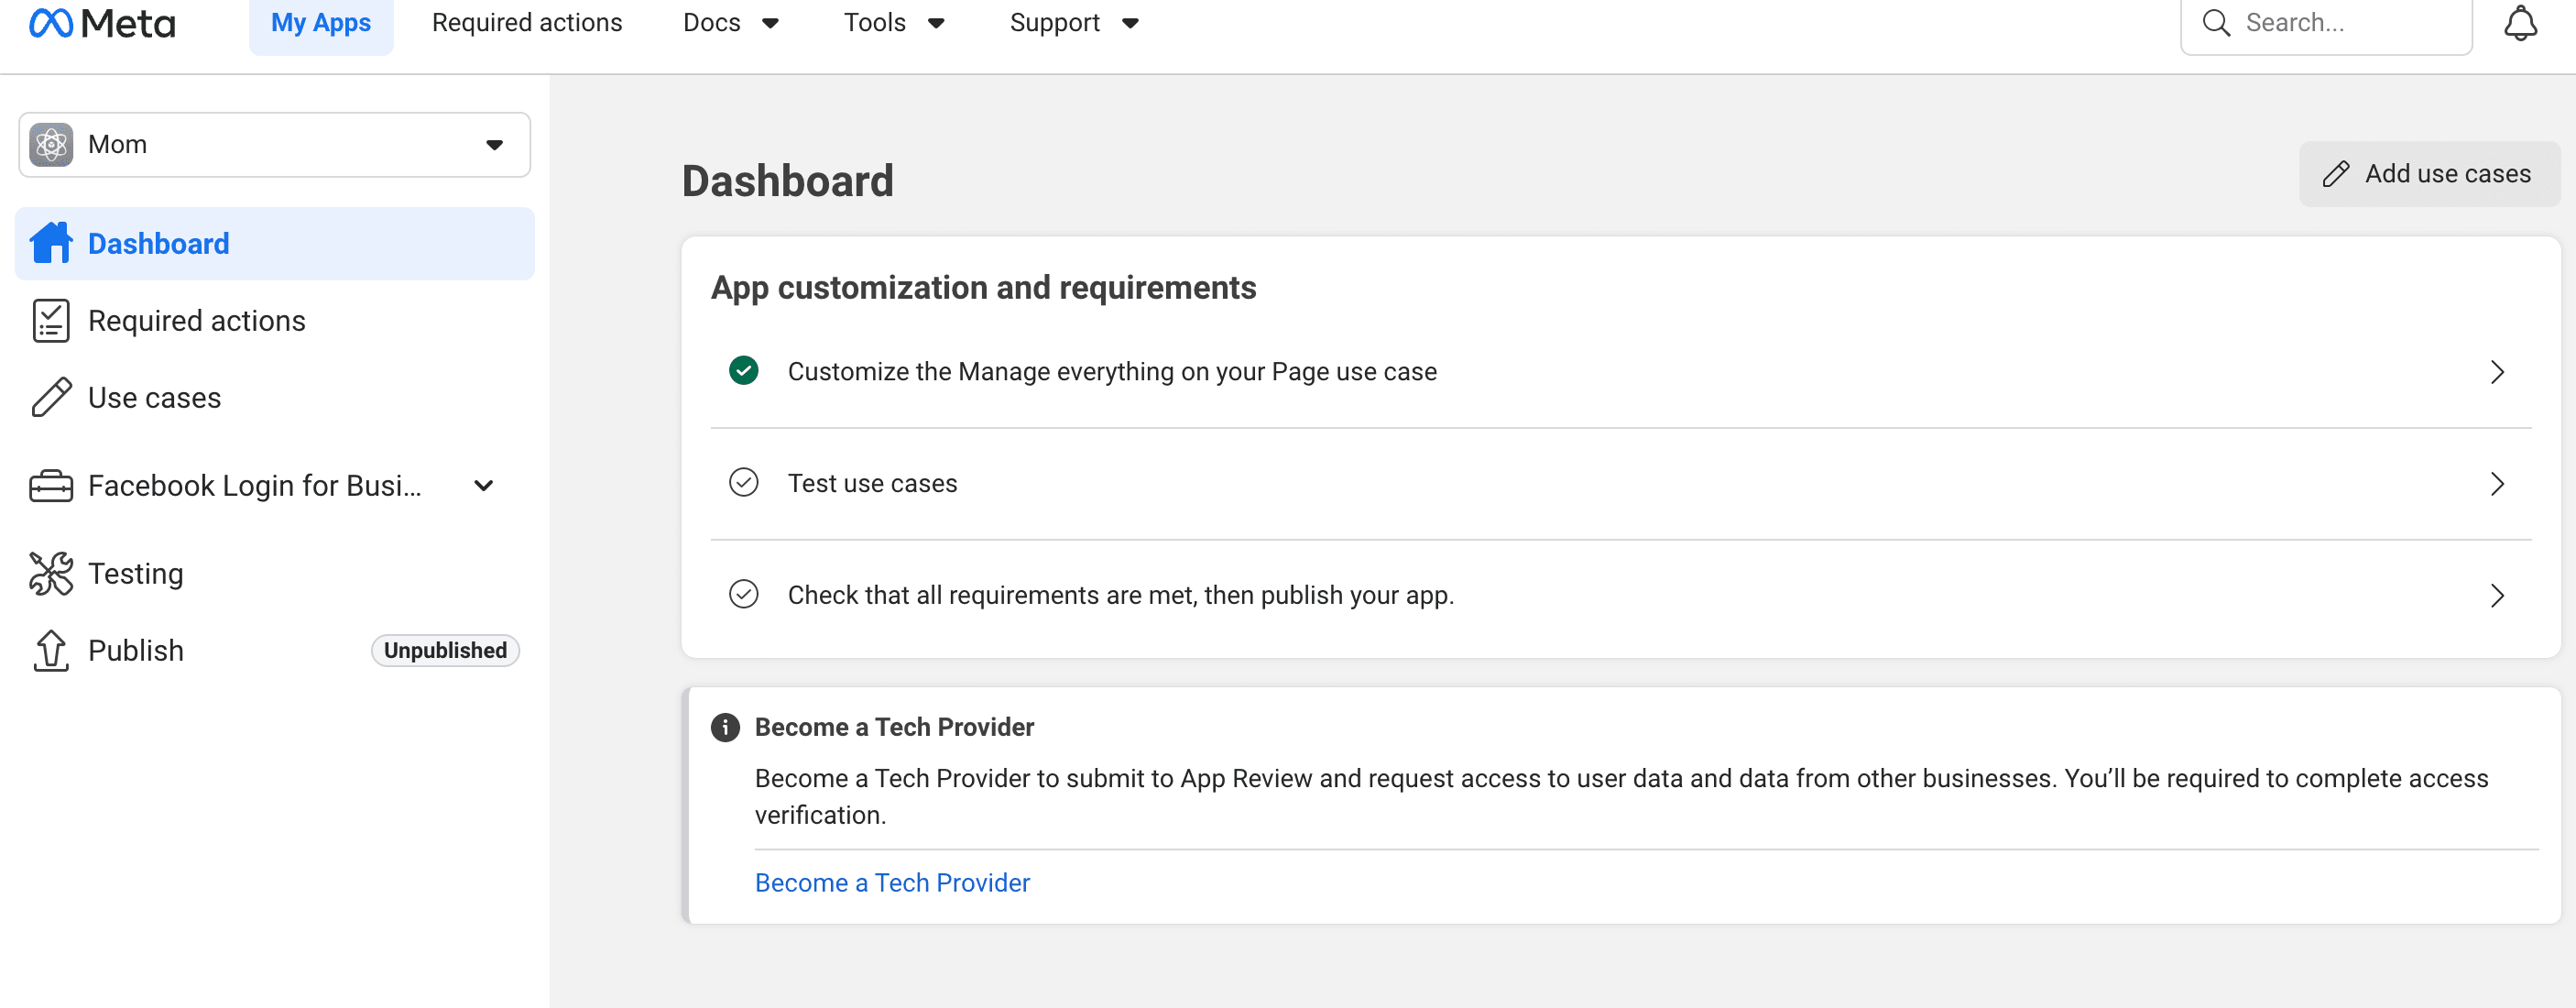
After creating the app, open Customize if you need to add the use case.
2. Add Page permissions
- Add the Page permission setIn Use cases/App Review, add pages_show_list, pages_read_engagement, pages_read_user_content, pages_manage_posts, pages_manage_metadata and pages_manage_engagement. public_profile normally accompanies Meta sign-in.
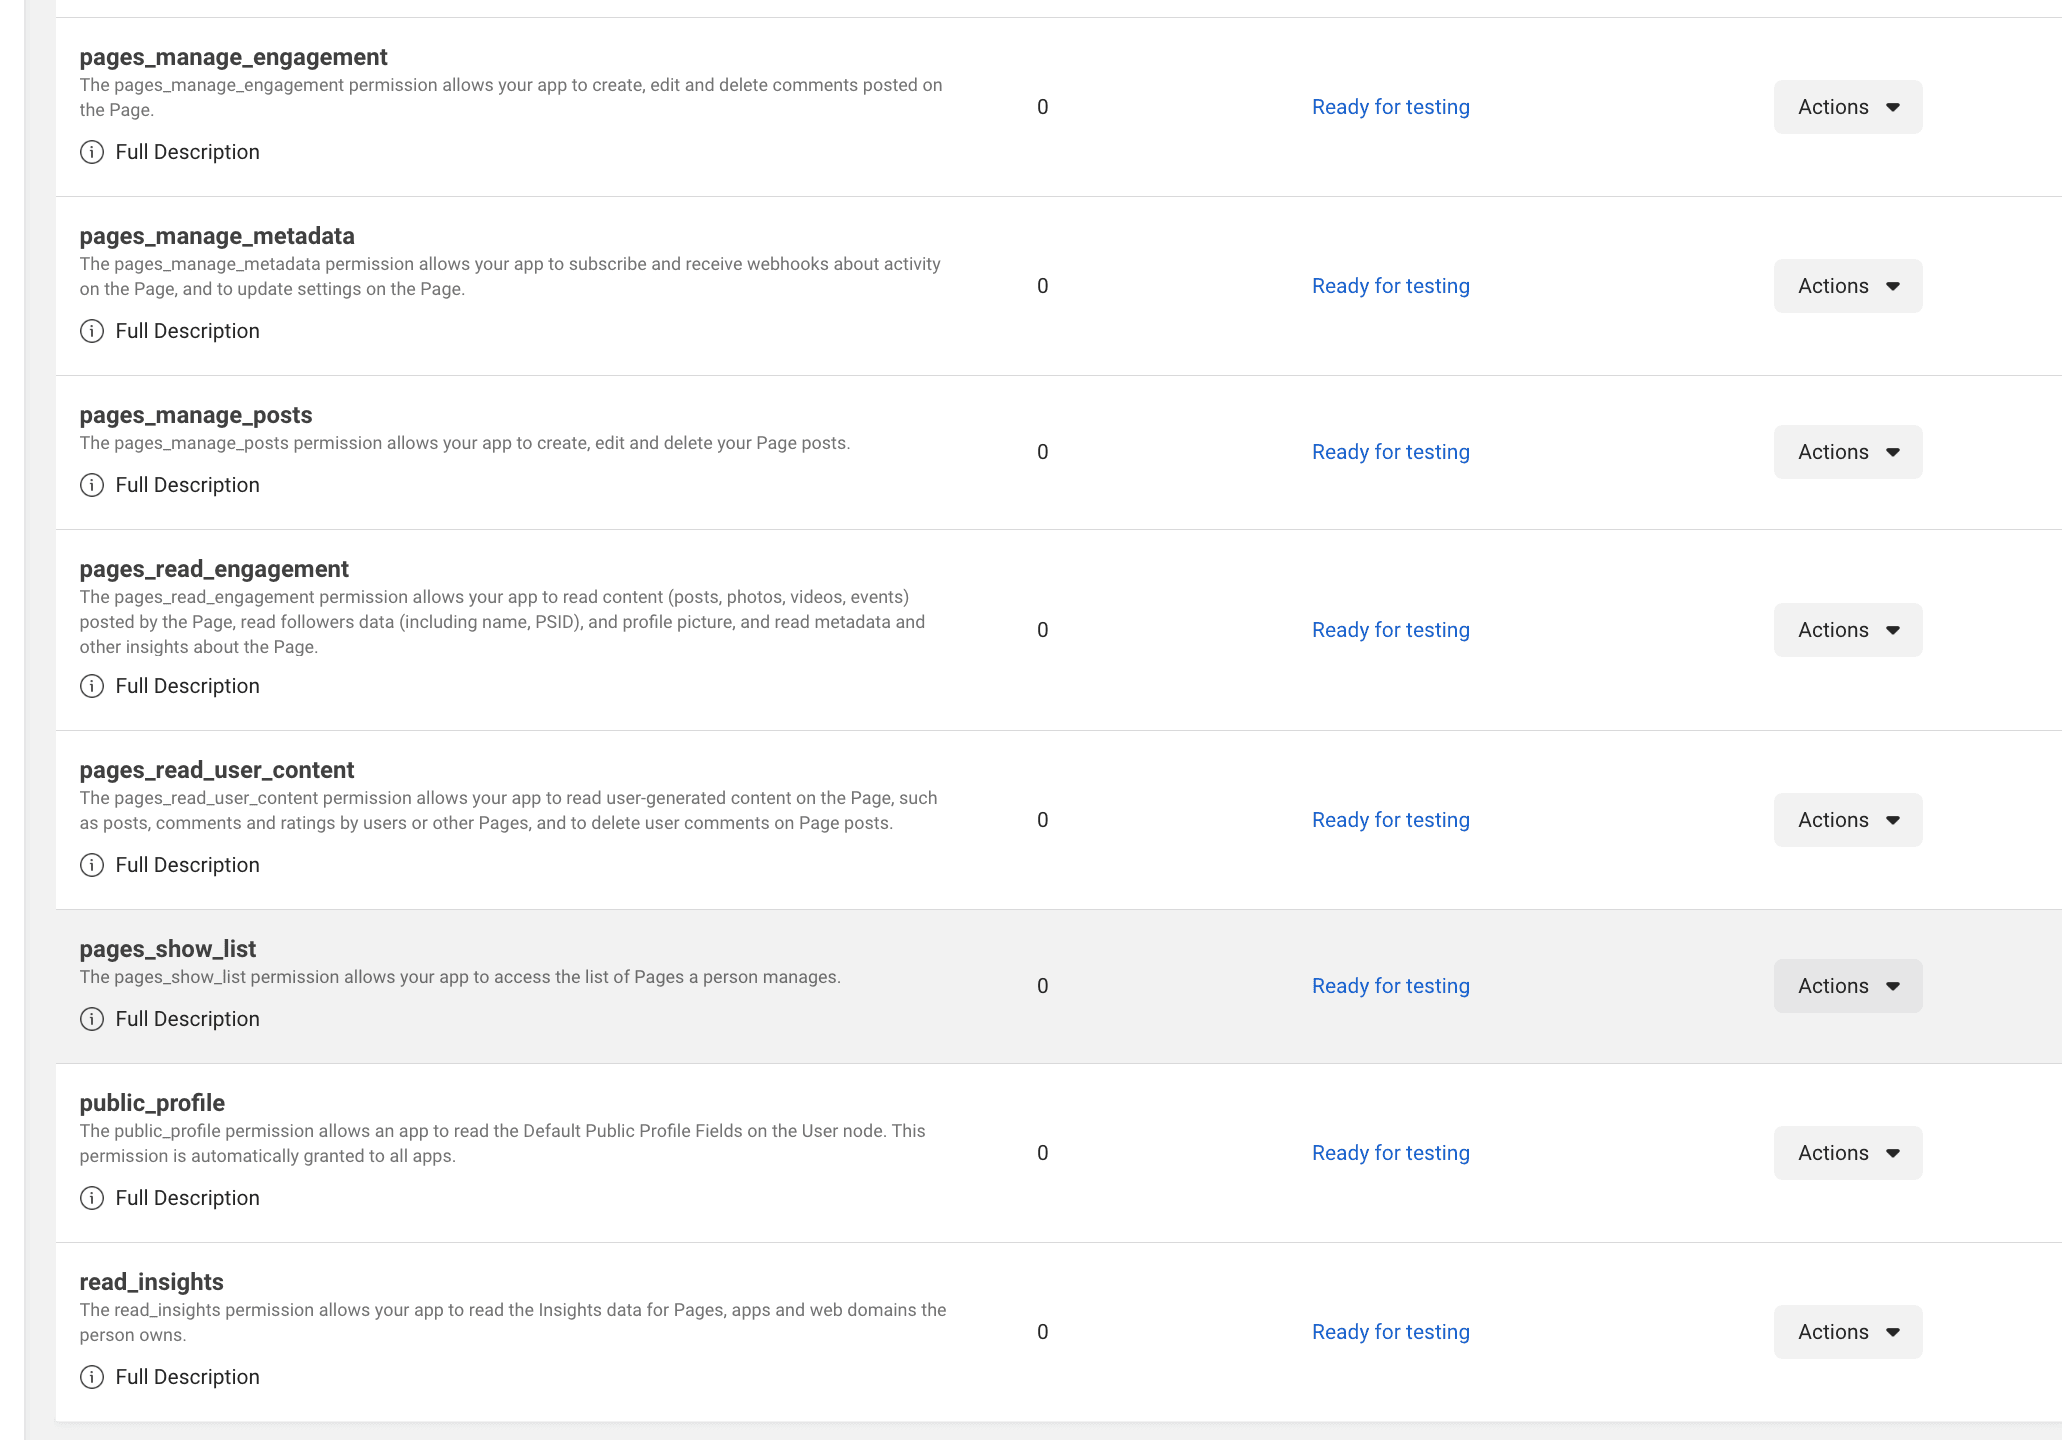
Add the Page permissions shown here. Ready for testing is enough while you are testing.
3. Generate and extend the Page token
- Open Graph API ExplorerOpen Graph API Explorer and select your Meta app at the top of the page.
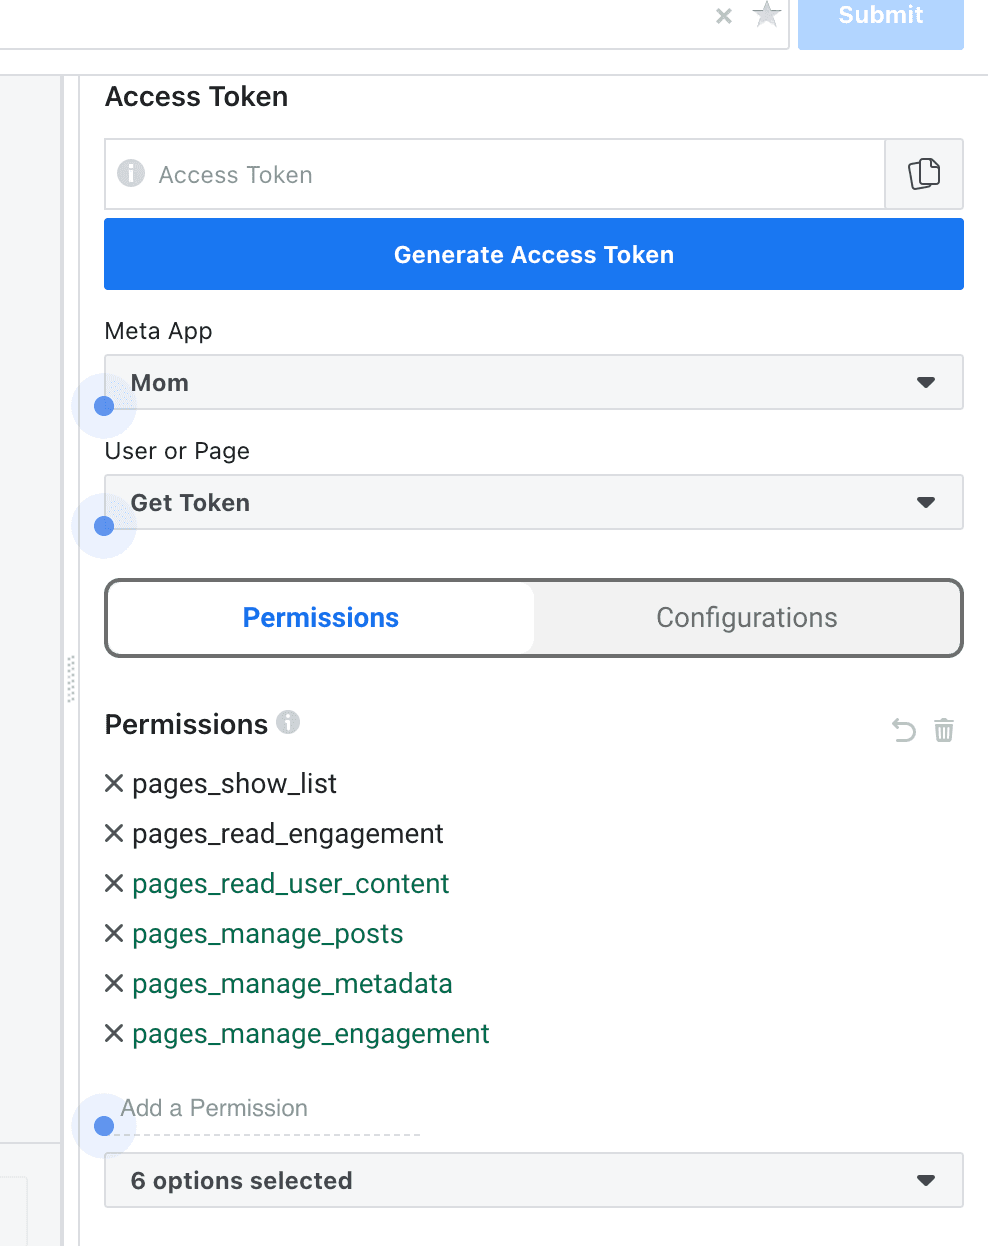
Select the app, then tick the Page permissions before Generate Access Token. - Get User Access TokenChoose Get User Access Token, tick the Page permissions, then Generate Access Token.
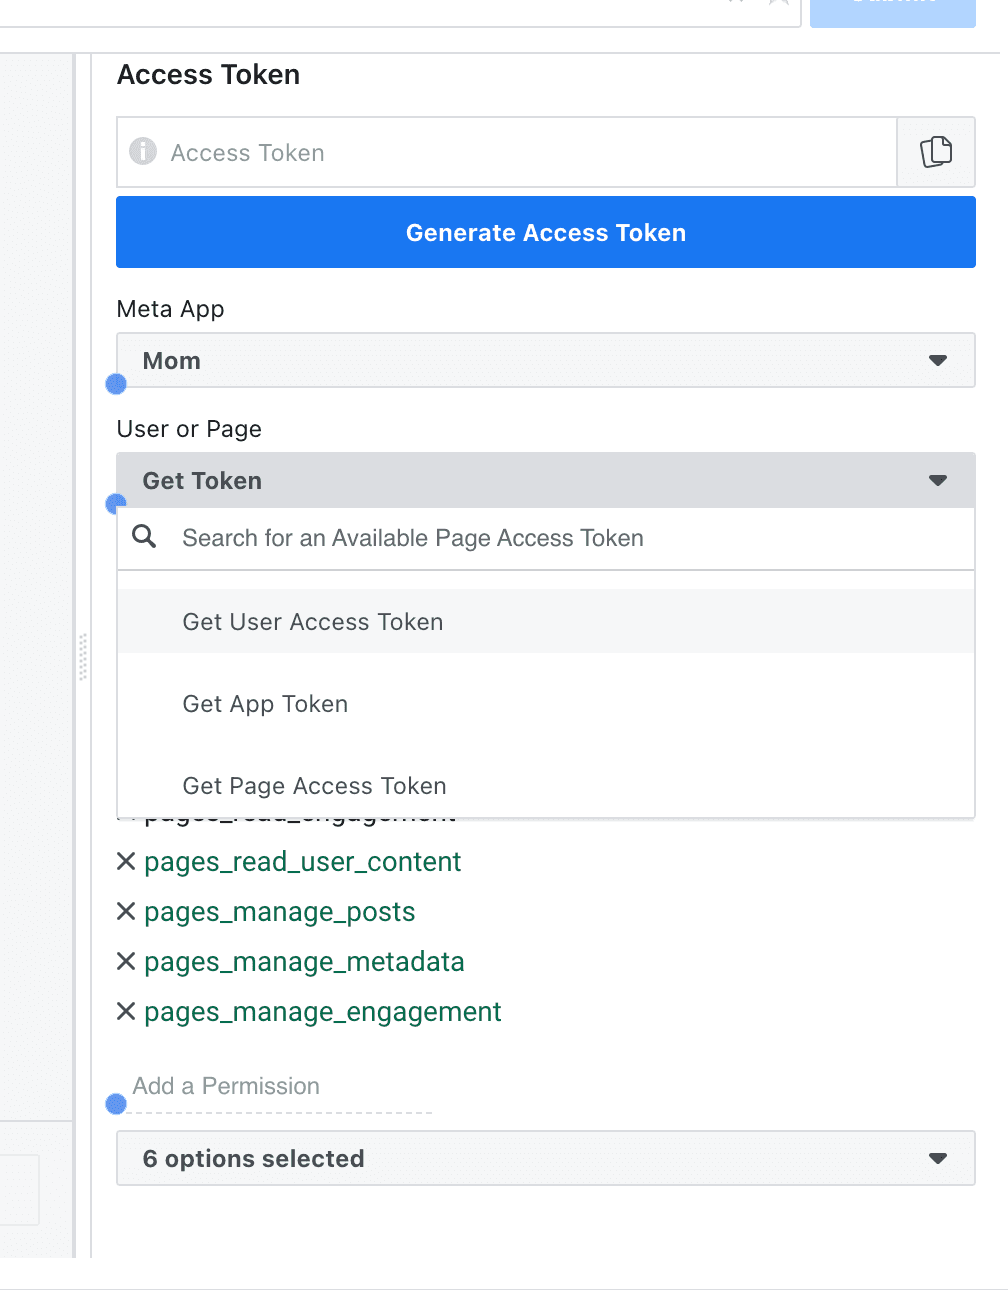
Choose Get User Access Token, tick Page permissions, then Generate. - Choose the PageIn the permission window, select the Page you want to connect and allow the requested permissions.
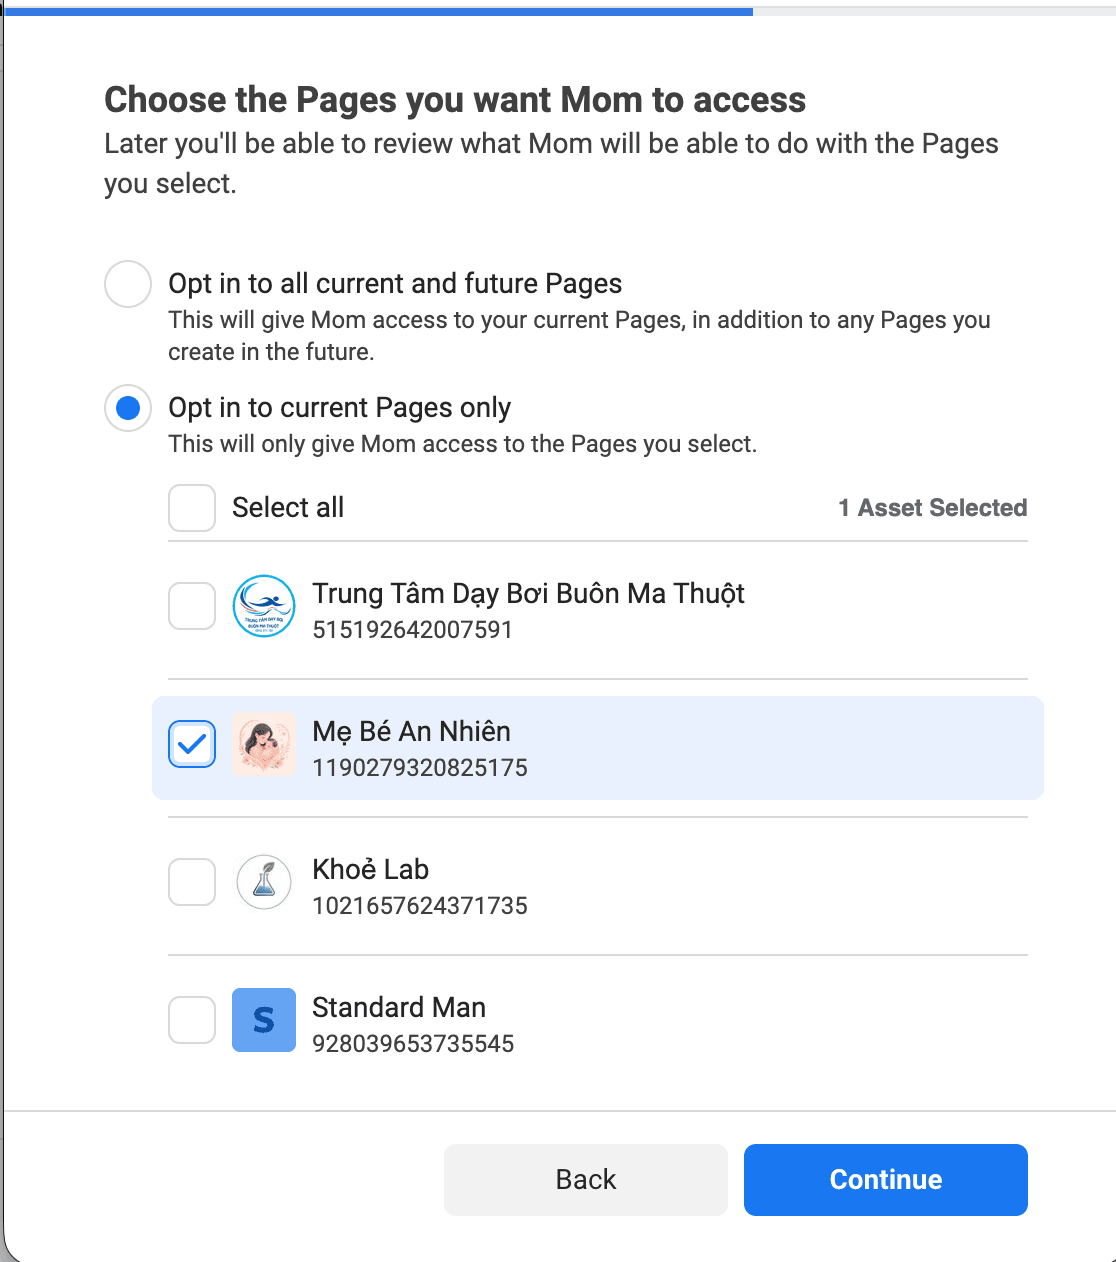
Select the Page that will publish Reels, then allow the permissions. - Switch to a Page tokenBack in Graph API Explorer, change User or Page to the Page and generate the access token again.
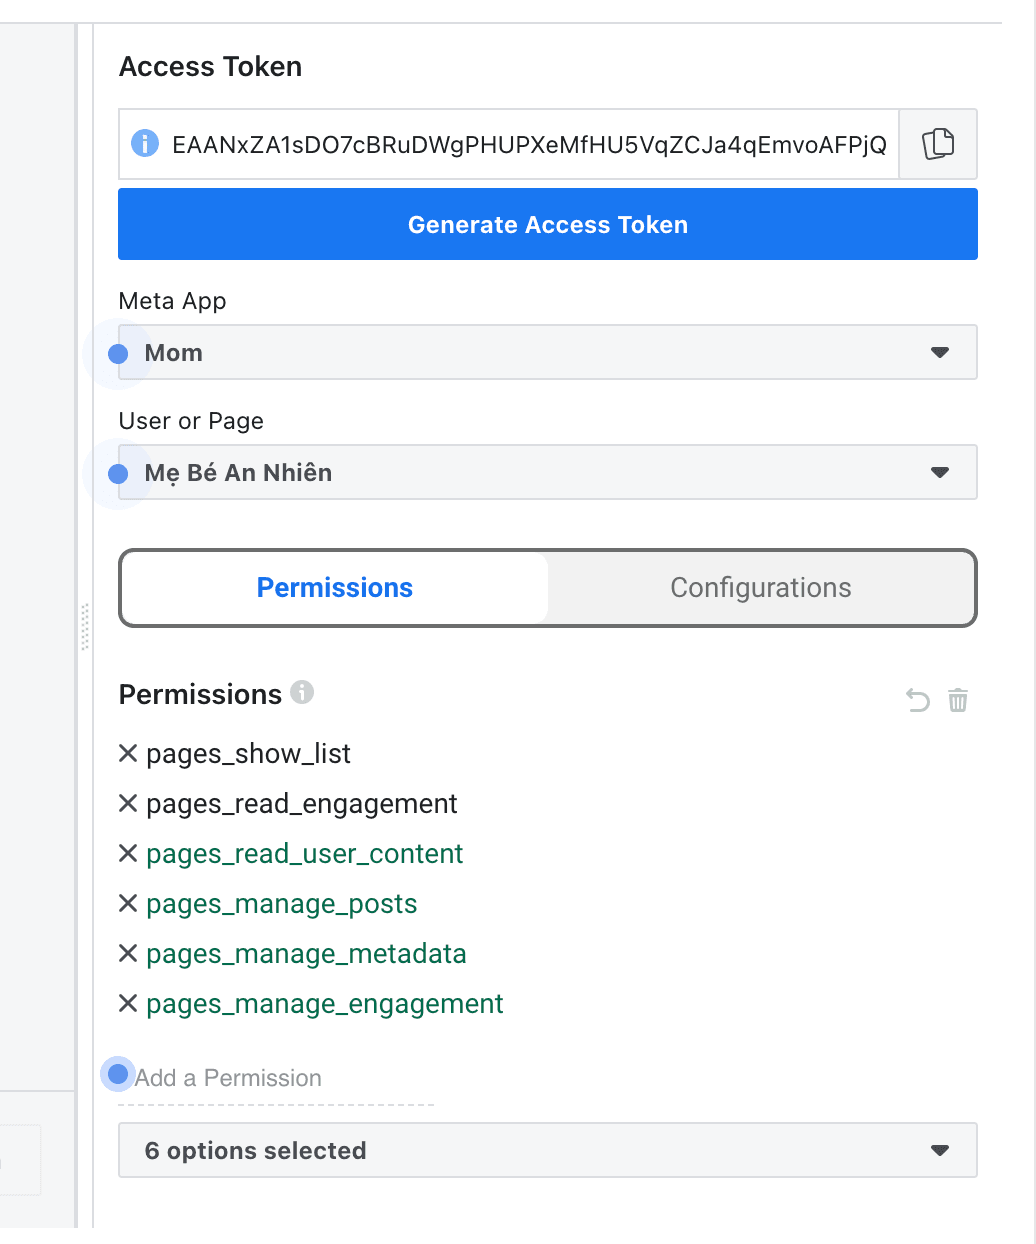
Choose the Page instead of User, then Generate again to get a Page token. - Confirm the permissionsThe Explorer permission list should show the full Page permission set.
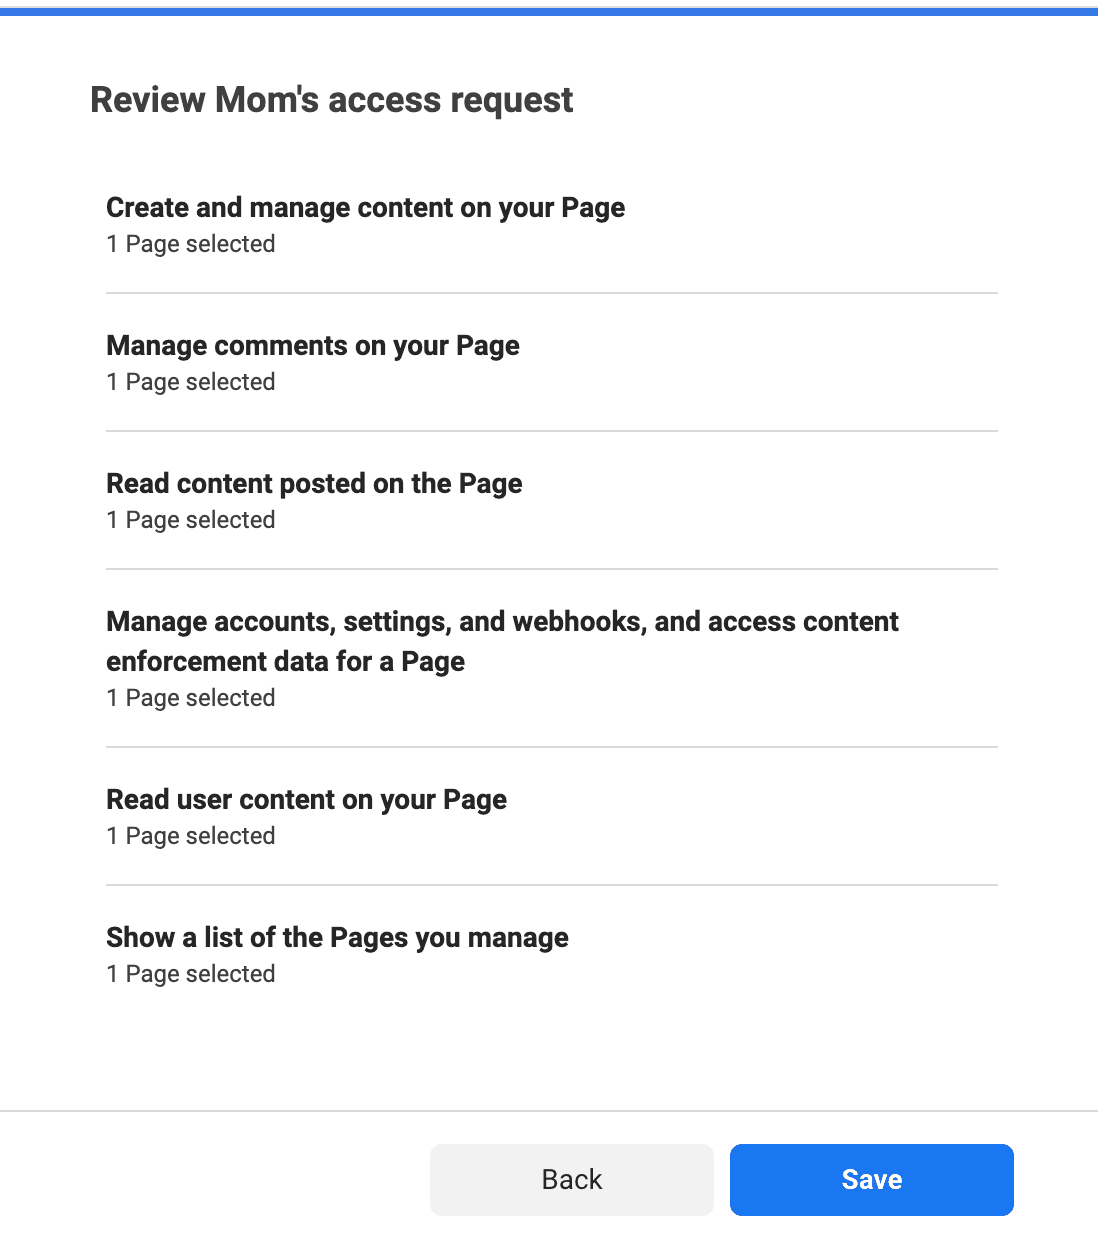
If the Page permissions are listed, the token type is correct. - Extend the tokenCopy the token into Access Token Debugger, choose Debug, then Extend Access Token. Copy the extended token. About 3 months of expiry is normal; extend it again when it expires.
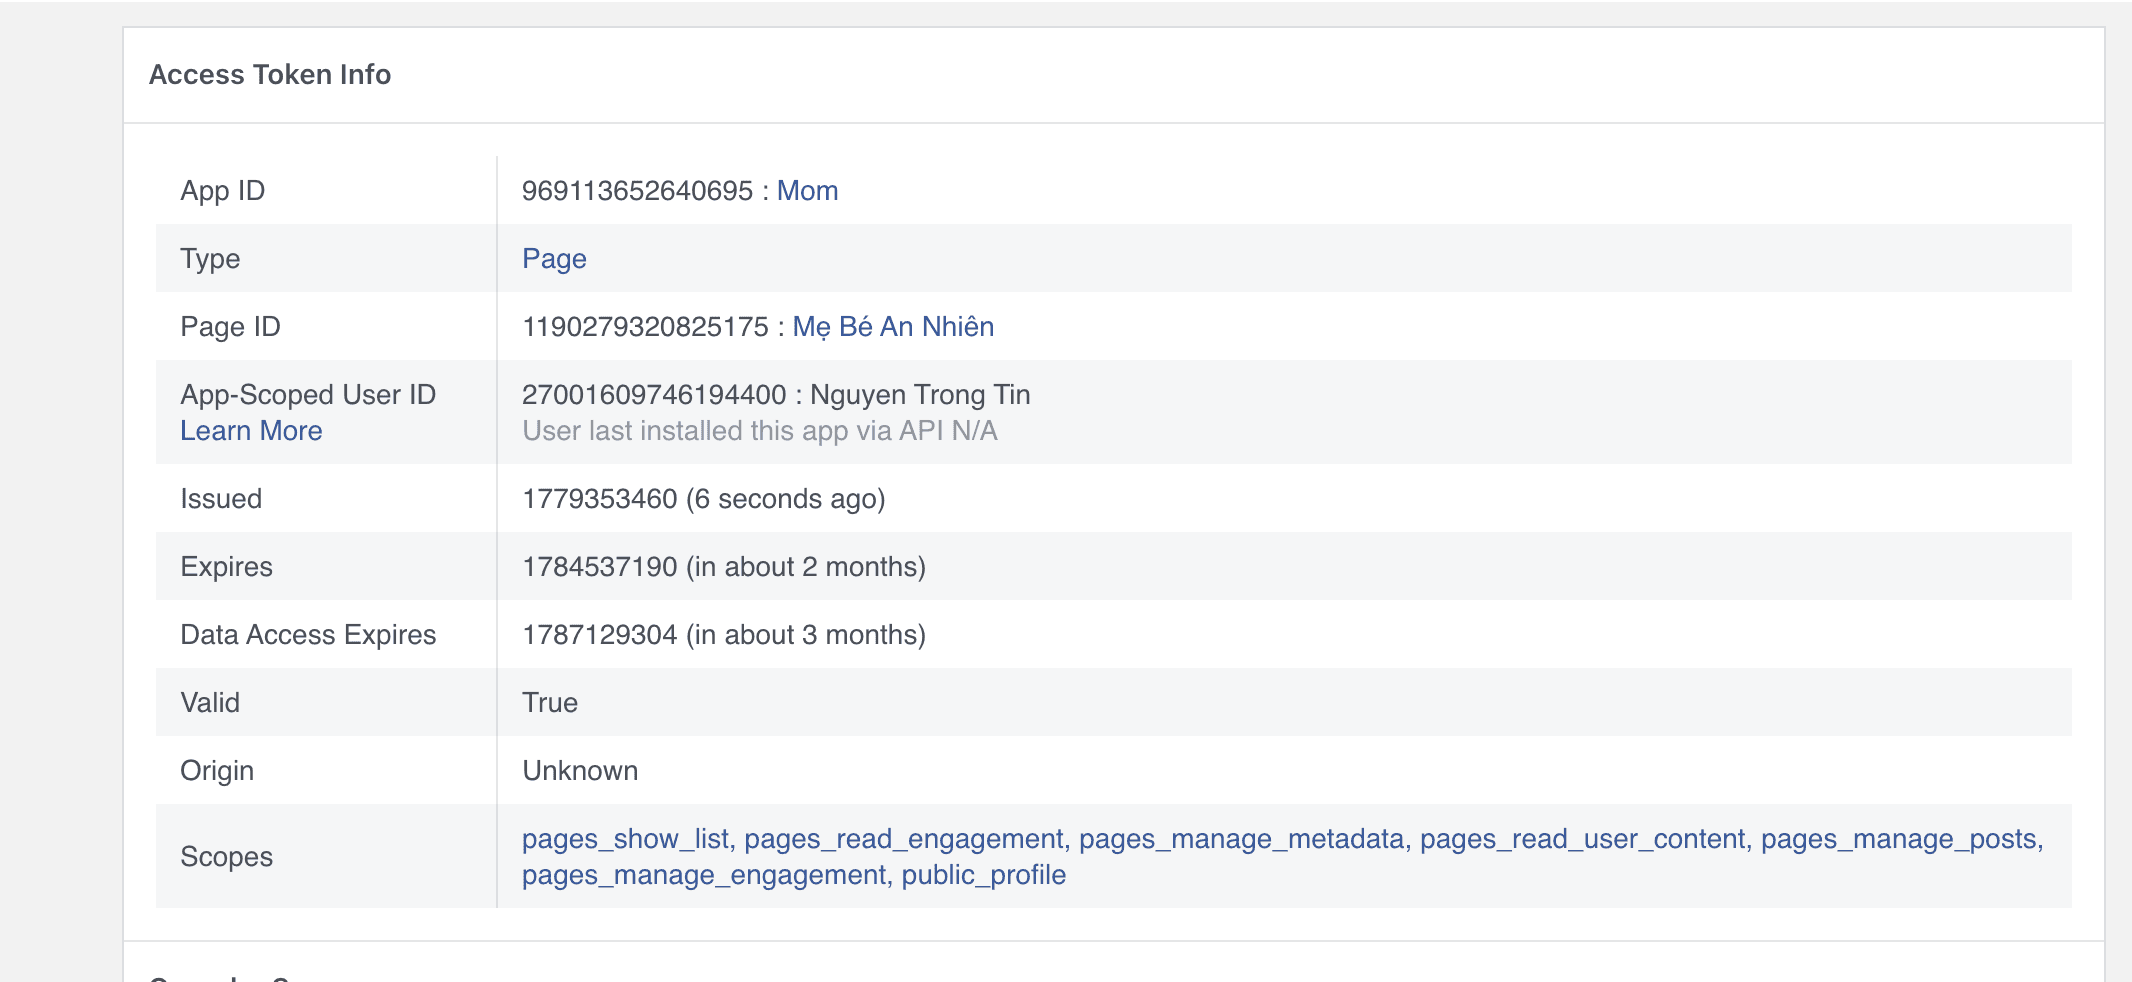
Debug the token, choose Extend Access Token, then copy the new token.
NoteNever publish an access token. Revoke and replace it immediately if it is exposed.
4. Save and publish in FastScene
- Open Add Page, paste the Page ID and extended Page access token, then save. The token stays on this computer and is not shown again.
- Choose Draft, Publish now or a schedule, then review the caption and upload.
- Facebook Reels have no separate title. FastScene keeps the source URL in Source comment and sends it only after the Reel is published.
5. Take the app Live
A Development/Testing app is normally limited to admins, developers and testers. To publish Reels for a real Page, the app must be Live. Watch the video first if you want, then follow the steps below.
- Create a Privacy Policy URLMeta requires a Privacy Policy URL. You can generate a hosted page, copy the URL, then paste it into Meta.
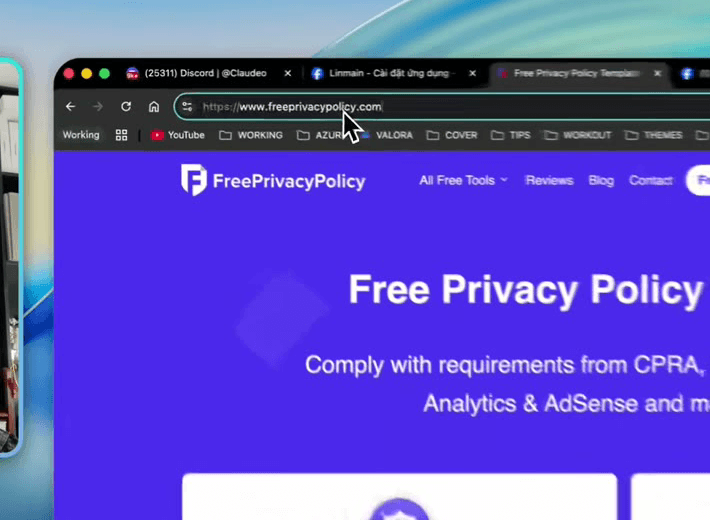
Create a Privacy Policy URL and copy the hosted link. This is required to go Live. - Paste it on Go LiveOpen Go Live. Paste the Privacy Policy URL and confirm the Page management use case is on the app.
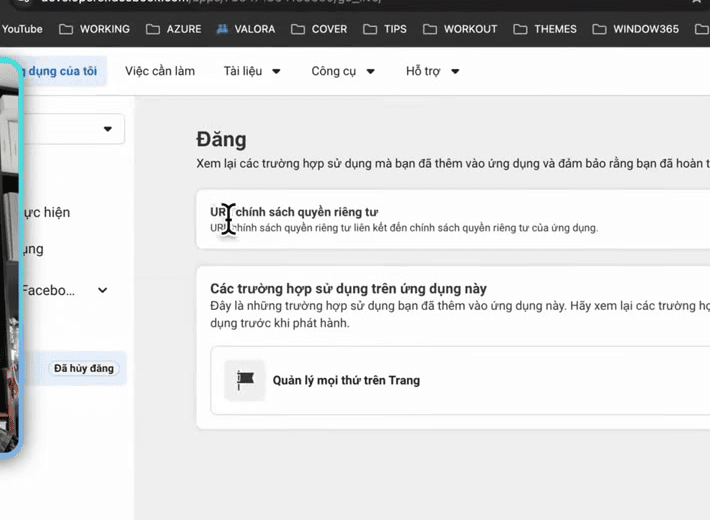
Paste the Privacy Policy URL on Go Live before publishing the app. - Publish while UnpublishedThe Publish sidebar still shows Unpublished. Choose Publish, finish any remaining Meta items, then make the app public.
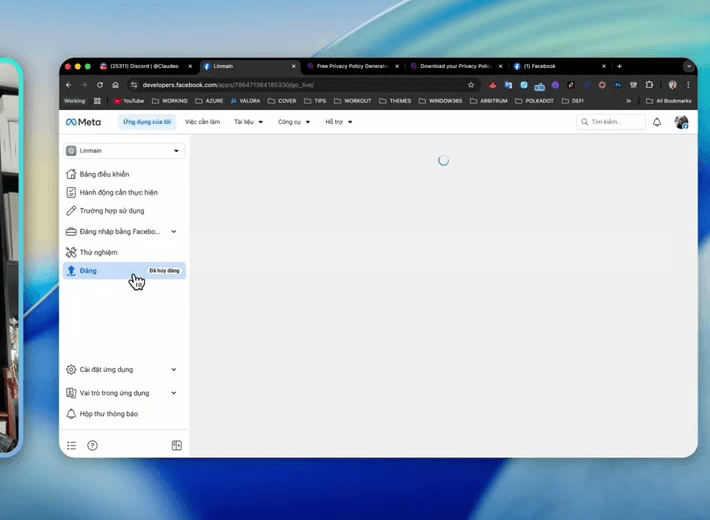
Choose Publish while the status is still Unpublished. - Confirm LiveWhen finished, Publish changes to Published. A Live app can publish Reels for Pages outside tester accounts, depending on whether Meta still requires App Review.
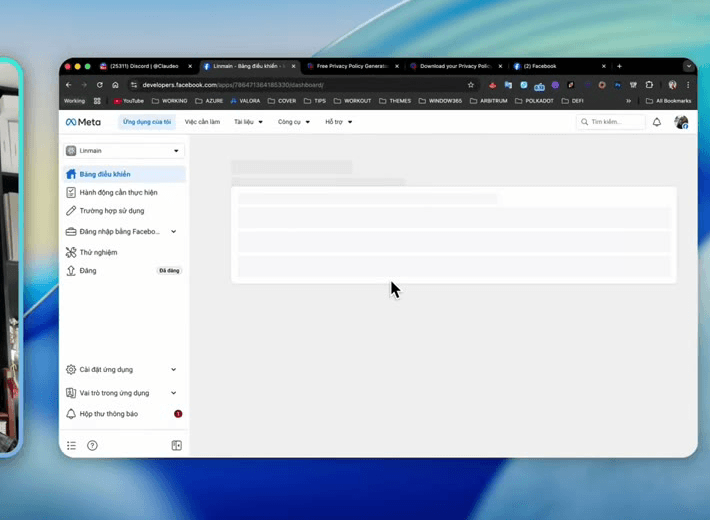
Published means the app is public.
NoteComplete both the Privacy Policy and Publish steps as shown in the video. For App Review, prepare a demo of a user selecting a video and publishing it to a Page they manage.
6. Common errors
- OAuthException or invalid token: the token expired, is for the wrong Page, or is missing permissions; generate or extend a new Page token.
- Cannot publish: confirm the account can create Page content, the app is Live, and the permission set is complete.
- A failed source comment can mean the Reel is still processing; wait until it is published, then retry the comment.
09
Troubleshooting
Common issues
Read the final app message before retrying. Most failures come from the voice provider, source media, rendering or platform authorization.
Audio and APIs
- Gemini 401/403/429: check the key, free-tier quota (~10 TTS calls/day), billing and permissions, or add another key.
- Misaligned karaoke: keep the script identical to the speech and add an ElevenLabs key with the first 3 Access permissions (Text to Speech, Forced Alignment, Voice Generation).
- Vbee errors: check App ID, Token, voice code, mode and script length.
YouTube and Facebook
- redirect_uri_mismatch: copy the exact localhost:8765 callback into Google Cloud.
- YouTube invalid_grant: remove the old account permission and connect the channel again.
- Facebook permission errors: confirm the Page, pages_manage_posts permission and the app's Live/tester status.
App and license
- If a web purchase is not visible, confirm both surfaces use the same Google account, leave the app open for about 5 minutes, then refresh.
- Upload Center needs active Pro and a rendered final_video.mp4.
- Wait for autosave before closing the app immediately after an edit.